AVI에서 제공하는 AKO인 INGRESS Controller를 사용 하는 방법 제공
ManageMent Cluster로 Context 변경
 1
 2
 3
 4
 5
 6
 7
 8
 9
10
11
12
13
14
15
16
17
18
19
20
21
22
23
24
25
26
27
28
29
30
31
32
33
34
35
36
37
### NodePort 변경
kubectl apply -f - << EOF
apiVersion: networking.tkg.tanzu.vmware.com/v1alpha1
kind: AKODeploymentConfig
metadata:
  name: nodeport01
spec:
  adminCredentialRef:
    name: avi-controller-credentials
    namespace: tkg-system-networking
  certificateAuthorityRef:
    name: avi-controller-ca
    namespace: tkg-system-networking
  cloudName: Default-Cloud
  clusterSelector:
    matchLabels:
      ako-l7-nodeport-01: "true"
  controller: avi.tkg.io
  dataNetwork:
    cidr: 10.253.127.0/24
    name: LS_TKGM_10.253.127.x
  extraConfigs:
    cniPlugin: antrea
    disableStaticRouteSync: false
    l4Config:
      autoFQDN: disabled
    ingress:
      defaultIngressController: true
      disableIngressClass: false
      nodeNetworkList:
        - cidrs:
            - 10.253.127.0/24
          networkName: LS_TKGM_10.253.127.x
      serviceType: NodePort
      shardVSSize: SMALL
  serviceEngineGroup: Default-Group
EOF
 1
 2
 3
 4
 5
 6
 7
 8
 9
10
11
12
13
14
15
16
17
18
19
20
21
22
23
24
25
26
27
28
29
30
31
32
33
34
35
36
37
### ClusterIP 변경
kubectl apply -f - << EOF
apiVersion: networking.tkg.tanzu.vmware.com/v1alpha1
kind: AKODeploymentConfig
metadata:
  name: clusterip01
spec:
  adminCredentialRef:
    name: avi-controller-credentials
    namespace: tkg-system-networking
  certificateAuthorityRef:
    name: avi-controller-ca
    namespace: tkg-system-networking
  cloudName: Default-Cloud
  clusterSelector:
    matchLabels:
      ako-l7-clusterip-01: "true"
  controller: avi.tkg.io
  dataNetwork:
    cidr: 10.253.127.0/24
    name: LS_TKGM_10.253.127.x
  extraConfigs:
    cniPlugin: antrea
    disableStaticRouteSync: false                               # required
    l4Config:
      autoFQDN: disabled
    ingress:
      defaultIngressController: true
      disableIngressClass: false                                # required
      nodeNetworkList:                                          # required
        - cidrs:
            - 10.253.127.0/24
          networkName: LS_TKGM_10.253.127.x
      serviceType: ClusterIP                                    # required
      shardVSSize: SMALL                                       # required
  serviceEngineGroup: Default-Group
EOF
 1
 2
 3
 4
 5
 6
 7
 8
 9
10
11
12
13
14
15
16
17
18
19
20
21
22
23
24
25
26
27
28
29
30
31
32
33
34
35
36
37
38
39
40
### NodePortLocal 변경
kubectl apply -f - << EOF
apiVersion: networking.tkg.tanzu.vmware.com/v1alpha1
kind: AKODeploymentConfig
metadata:
  name: npl-enabled
spec:
  adminCredentialRef:
    name: avi-controller-credentials
    namespace: tkg-system-networking
  certificateAuthorityRef:
    name: avi-controller-ca
    namespace: tkg-system-networking
  cloudName: Default-Cloud
  clusterSelector:
    matchLabels:
      npl-enabled: "true"
  controlPlaneNetwork:
    cidr: 10.253.127.0/24
    name: LS_TKGM_10.253.127.x
  controller: avi.tkg.io
  dataNetwork:
    cidr: 10.253.127.0/24
    name: LS_TKGM_10.253.127.x
  extraConfigs:
    cniPlugin: antrea
    disableStaticRouteSync: false                               # required
    l4Config:
      autoFQDN: disabled
    ingress:
      defaultIngressController: true
      disableIngressClass: false
      nodeNetworkList:
        - cidrs:
            - 10.253.127.0/24
          networkName: LS_TKGM_10.253.127.x
      serviceType: NodePortLocal                                     # required
      shardVSSize: SMALL
  serviceEngineGroup: Default-Group
EOF
NodePort 테스트
1
2
3
4
5
kubectl config use-context { Management Cluster}
kubectl get cluster --show-labels
kubectl label cluster tkgm01-tkc-dev01 ako-l7-nodeport-01= true
1
2
3
4
5
6
7
kubectl config use-context { TKC}
kubectl create deploy hello --image= paulbouwer/hello-kubernetes:1.7 --replicas= 3 --port= 8080
kubectl expose deployment hello --type= NodePort --port= 80 --target-port= 8080
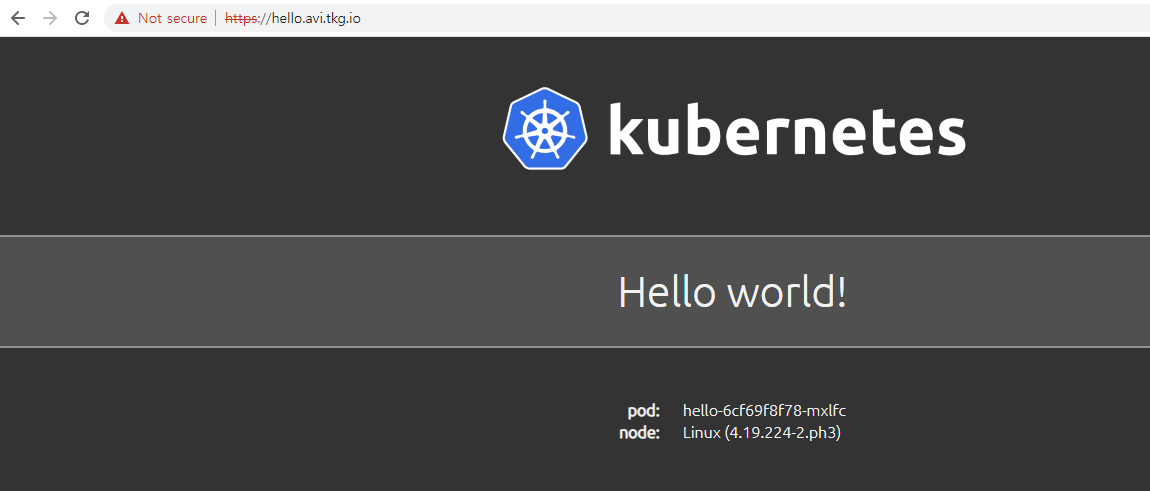
kubectl create ingress hello --class= avi-lb --rule= "hello.avi.tkg.io/=hello:8080"
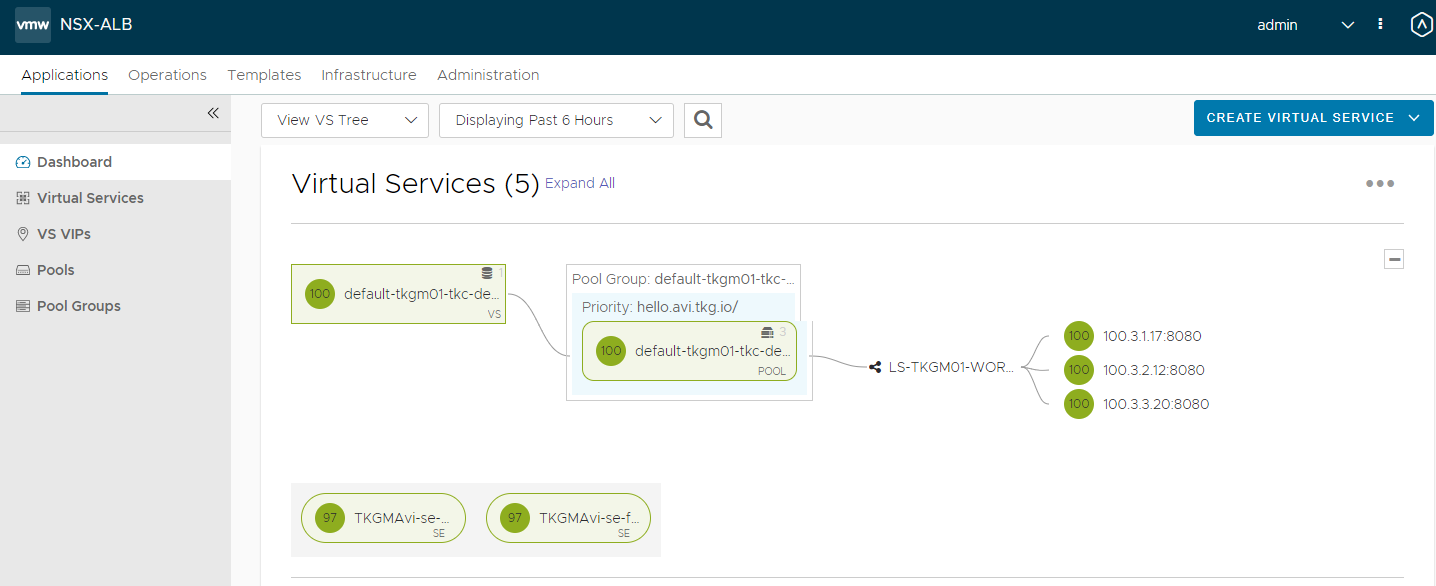
접속 화면
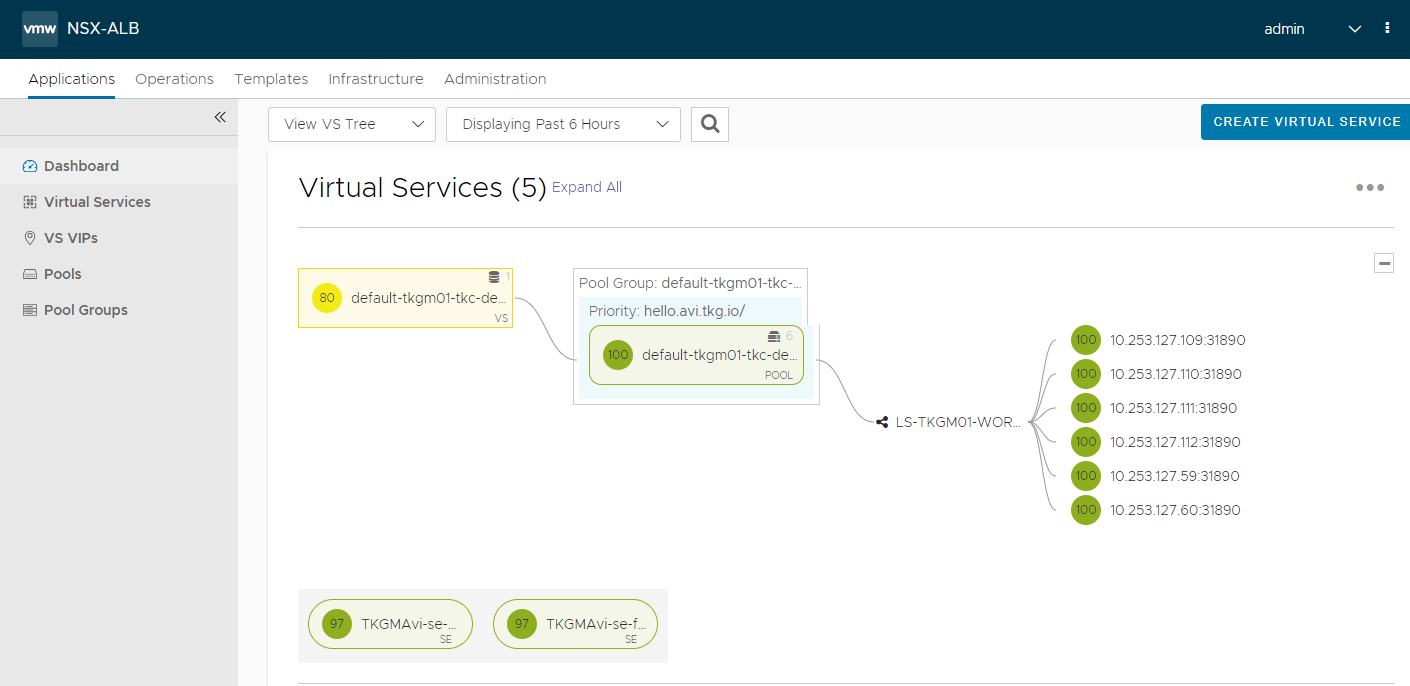
NodePort로 구성이 되어 있기 때문에 아래와 같이 NodeIP와 30000번대의 Port로 서버풀이 지정되는 것을 확인 할 수 있다.
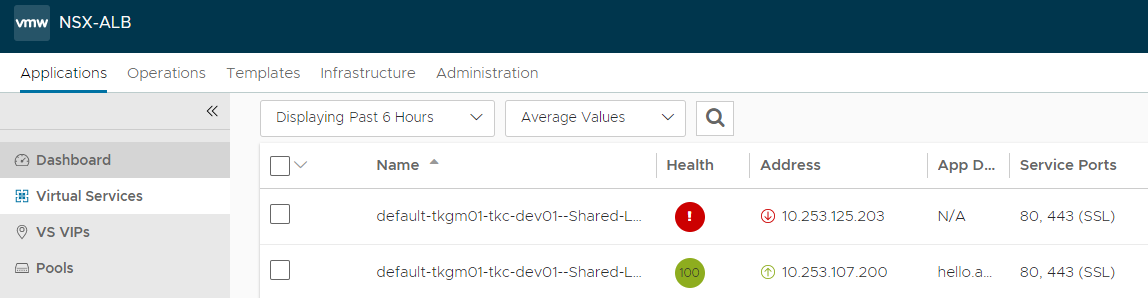
AVI VS 상태 확인
ClusterIP 테스트
1
2
3
4
5
kubectl config use-context { Management Cluster}
kubectl get cluster --show-labels
kubectl label cluster tkgm01-tkc-dev01 ako-l7-clusterip-01= true
1
2
3
4
5
6
7
8
9
kubectl config use-context { TKC}
kubectl get cm avi-k8s-config -n avi-system -o jsonpath ={ .data.serviceType}
kubectl create deploy hello --image= paulbouwer/hello-kubernetes:1.7 --replicas= 3 --port= 8080
kubectl expose deployment hello --type= ClusterIP --port= 80 --target-port= 8080
kubectl create ingress hello --class= avi-lb --rule= "hello.avi.tkg.io/=hello:8080"
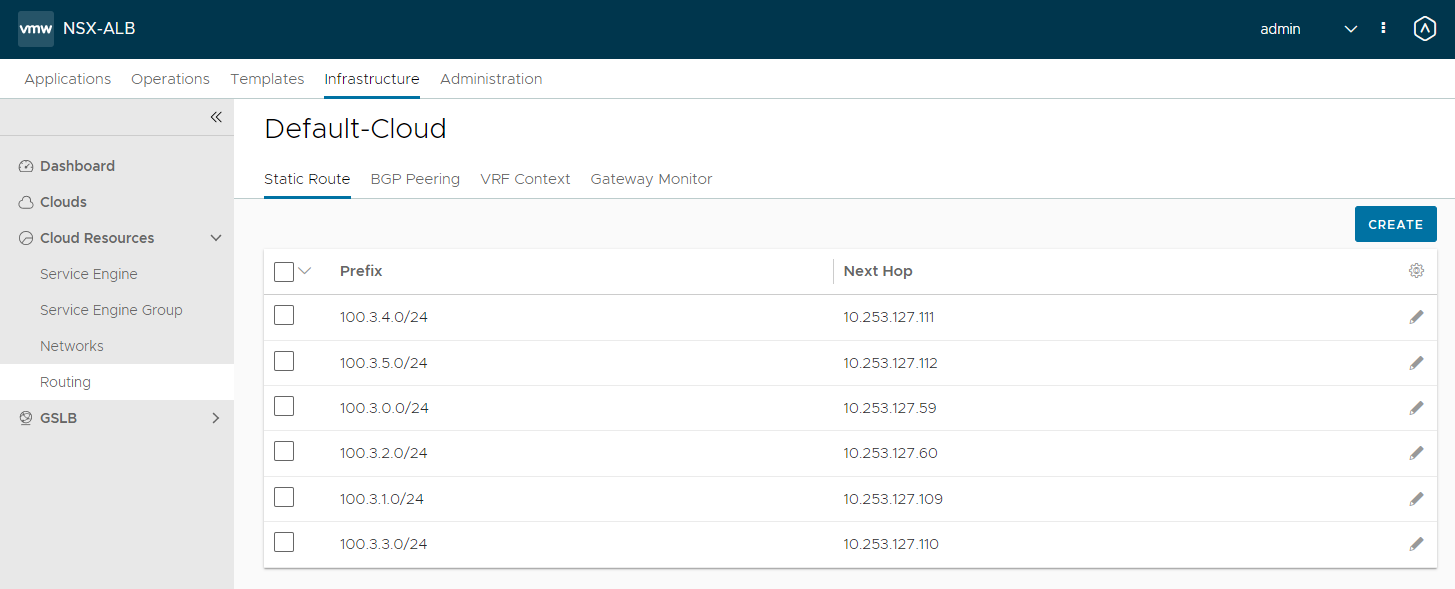
ServiceType 변경 확인
AVI Routing 확인
AVI VS 상태 확인
만약에 하나의 클러스터에서 VS별 SE-GROUP을 분리 하거나, 또는 VS의 IP 대역을 분리 하고 싶을 경우 AVIINFRASETTING을 사용하여 구성을 할 수 있다.
구성
 1
 2
 3
 4
 5
 6
 7
 8
 9
10
11
12
13
14
15
16
17
18
19
20
21
22
23
24
25
26
27
28
29
kubectl apply -f - << EOF
apiVersion: ako.vmware.com/v1alpha1
kind: AviInfraSetting
metadata:
  name: other-infra
spec:
  seGroup:
    name: Default-Group
  network:
    vipNetworks:
      - networkName: pg-dk-10.253.107.x
        cidr: 10.253.107.0/24
    enableRhi: false
  l7Settings:
    shardSize: MEDIUM
EOF

kubectl apply -f - << EOF
apiVersion: networking.k8s.io/v1
kind: IngressClass
metadata:
  name: other-infra
spec:
  controller: ako.vmware.com/avi-lb
  parameters:
    apiGroup: ako.vmware.com
    kind: AviInfraSetting
    name: other-infra
EOF
테스트
1
2
3
4
5
kubectl create deploy hello --image= paulbouwer/hello-kubernetes:1.7 --replicas= 3 --port= 8080
kubectl expose deployment hello --type= ClusterIP --port= 80 --target-port= 8080
kubectl create ingress hello --class= other-infra --rule= "hello.avi.tkg.io/=hello:8080"
VS IP 변경 전
VS IP 변경 후
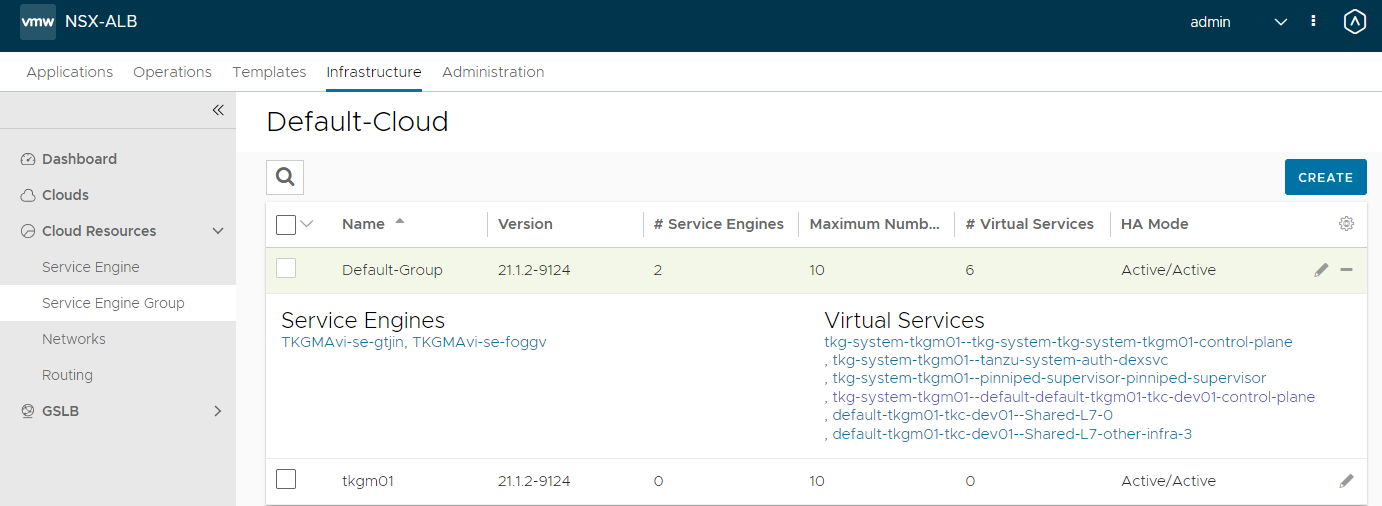
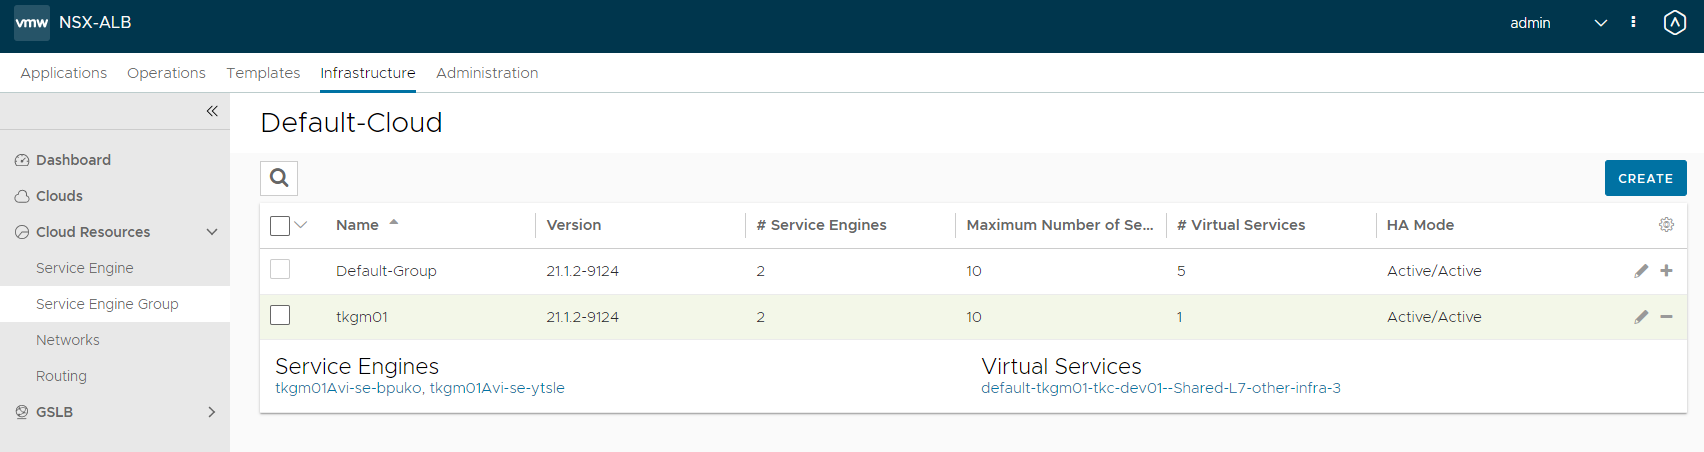
기존의 하나의 SE그룹에 모두 VS가 구성이 되어 있다.
SE Group 생성
1
2
3
4
## SEGROUP을 변경
kubectl patch aviinfrasettings other-infra --type 'json' -p '[{"op":"replace","path":"/spec/seGroup/name","value":"tkgm01"}]'

kubectl patch ing hello --patch '{"spec": {"ingressClassName": "other-infra"}}'
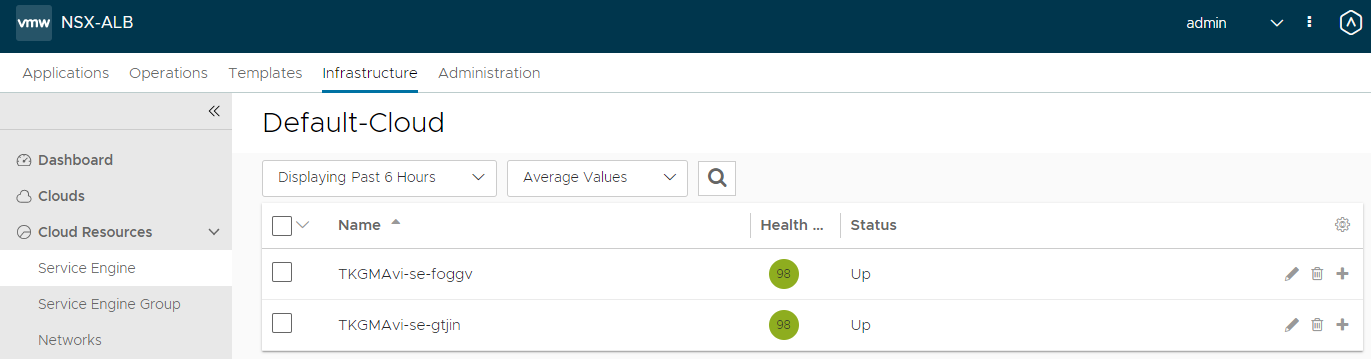
현재는 SE가 기존의
기존 SE 배포 전
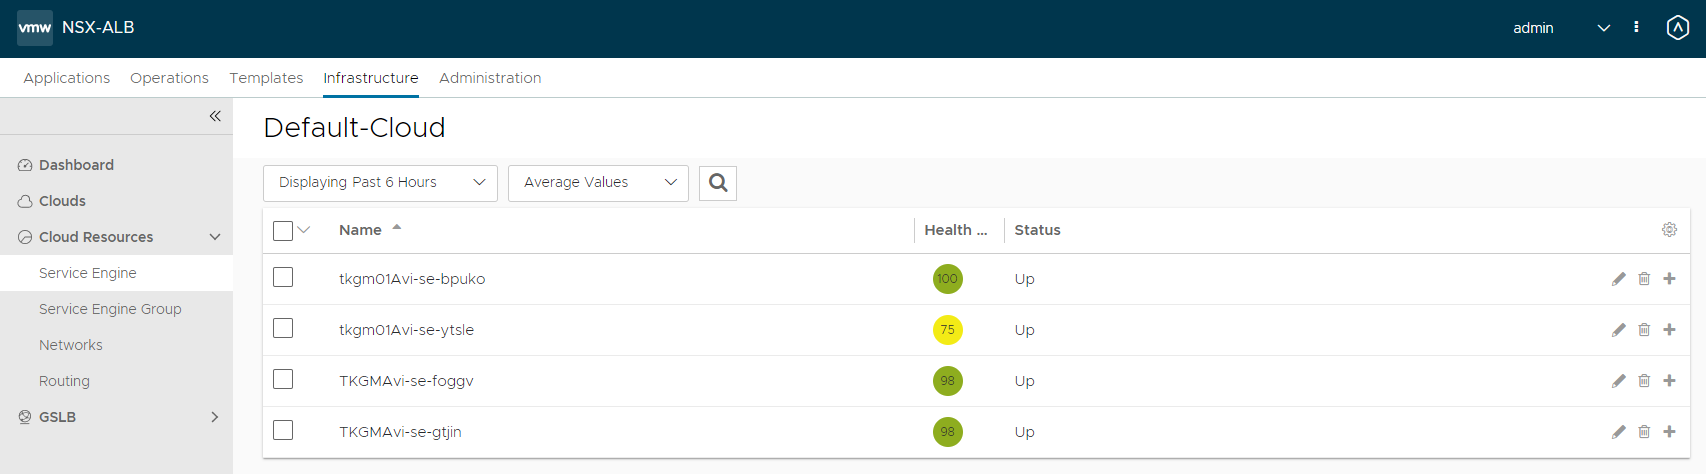
다른 SE 그룹으로 변경 후
다른 SE 그룹으로 변경 후
위와 같은 방법으로 동일한 클러스터 내에서 FQDN별로 SE-GROUP 또는 IP 대역을 분리 할 수 있다.
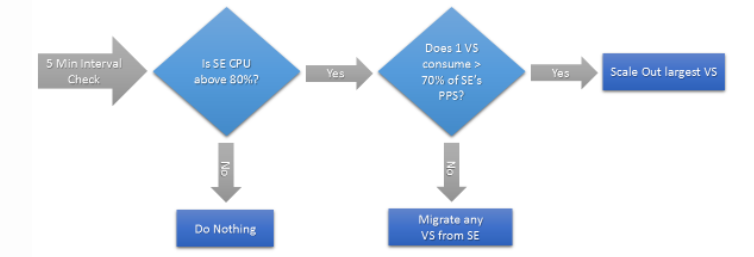
AVI Autoscalling 기본 동작
 1
 2
 3
 4
 5
 6
 7
 8
 9
10
11
12
13
14
15
16
17
18
19
20
21
22
23
24
25
26
27
28
29
30
31
32
33
34
35
36
## AVI Controller SSH접속
switchto tenant admin
switchto cloud Default-Cloud
auto_rebalance
save
configure serviceenginegroup Default-Group
auto_rebalance_interval interval-value
auto_rebalance_criteria option
auto_rebalance_capacity_per_se integer-value
예시: auto_rebalance_interval 300
auto_rebalance_criteria 의 옵션 값은 아래와 같음
se_auto_rebalance_cpu
se_auto_rebalance_mbps
se_auto_rebalance_open_conns
se_auto_rebalance_pps
예시: auto_rebalance_capacity_per_se 200000
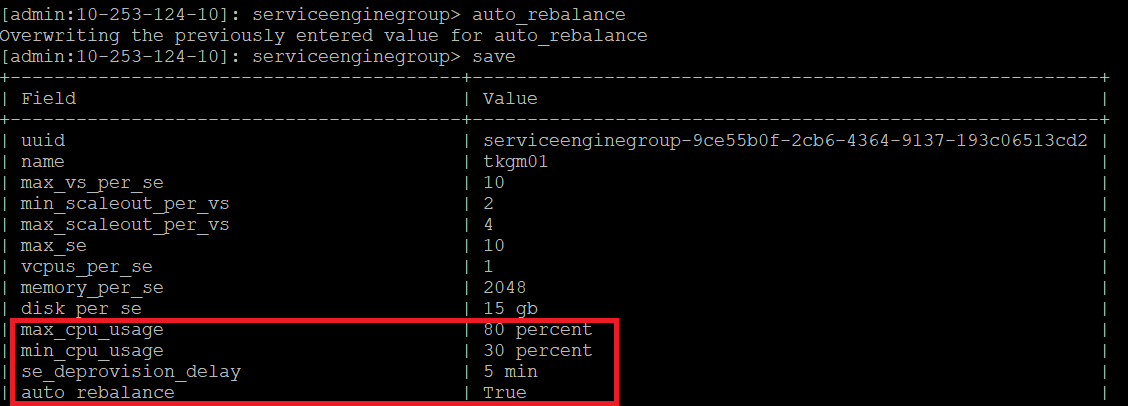
max_cpu_usage value
min_cpu_usage value
## 종합
switchto tenant Avi
switchto cloud azure
configure serviceenginegroup Default-Group
auto_rebalance_interval 300
auto_rebalance_criteria se_auto_rebalance_pps
auto_rebalance_capacity_per_se 200000
max_cpu_usage 70
min_cpu_usage 30
save
auto_rebalance 변경 전
auto_rebalance 변경 후
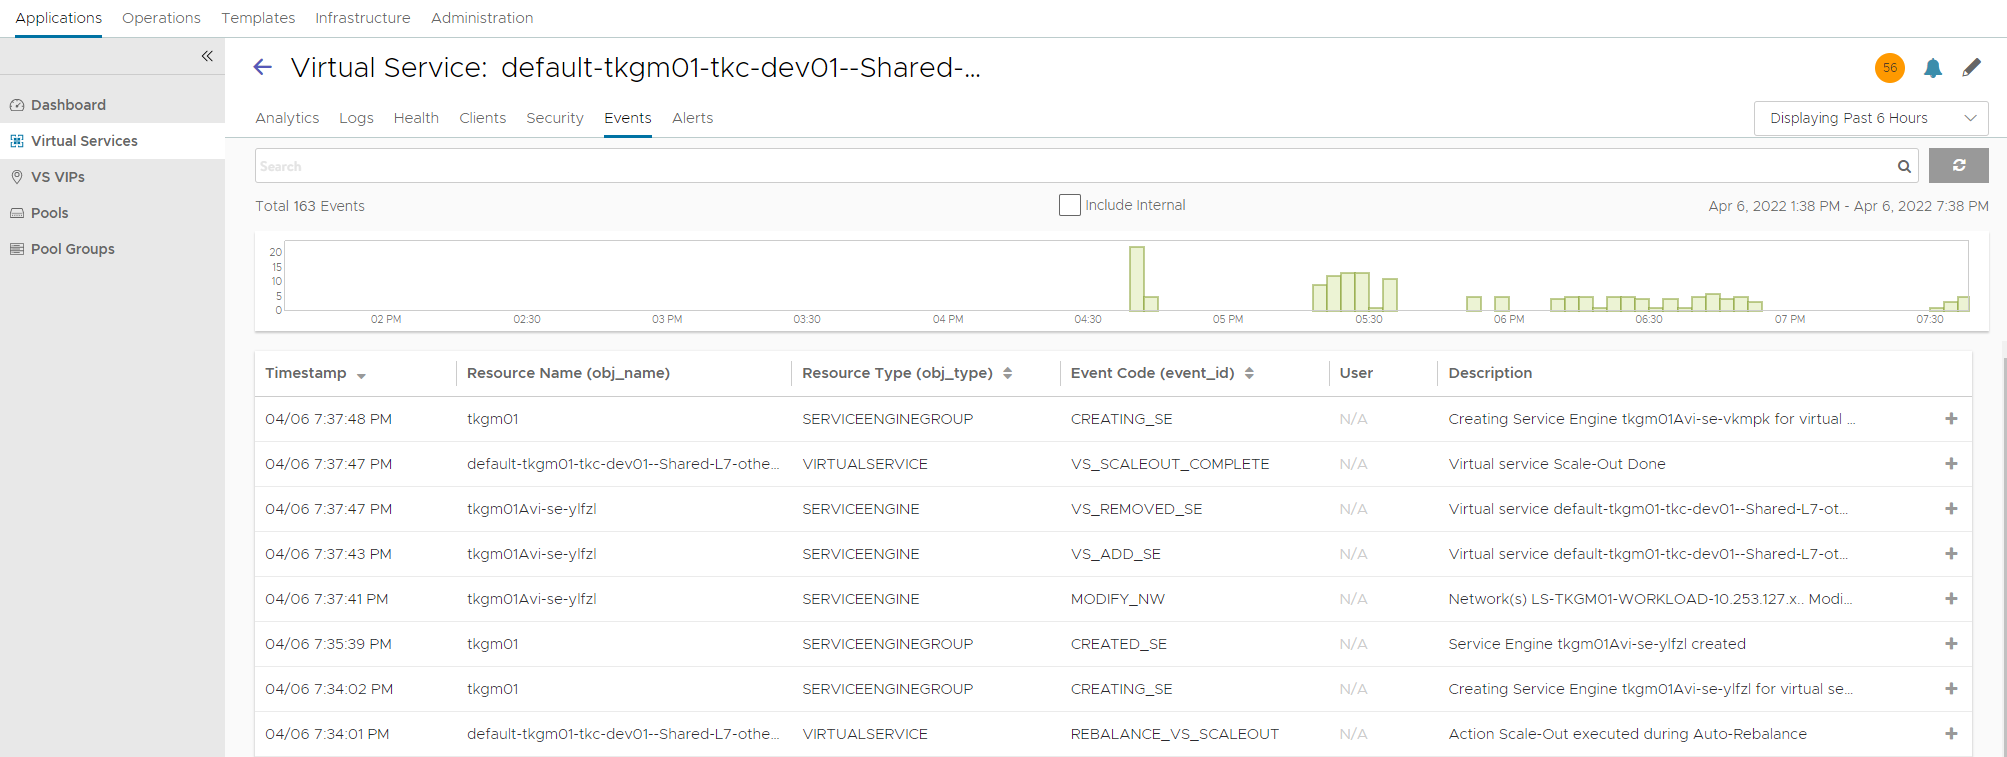
auto scallingout
BGP ECMP를 구성 하여 SE를 탄력적으로 확장을 할 수 있습니다.
물리 스위치에는 ECMP를 구성이 필요.
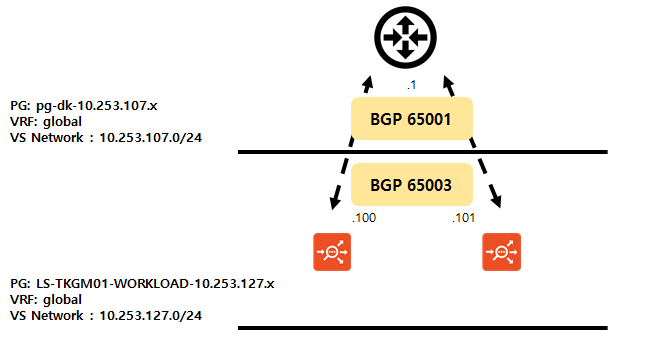
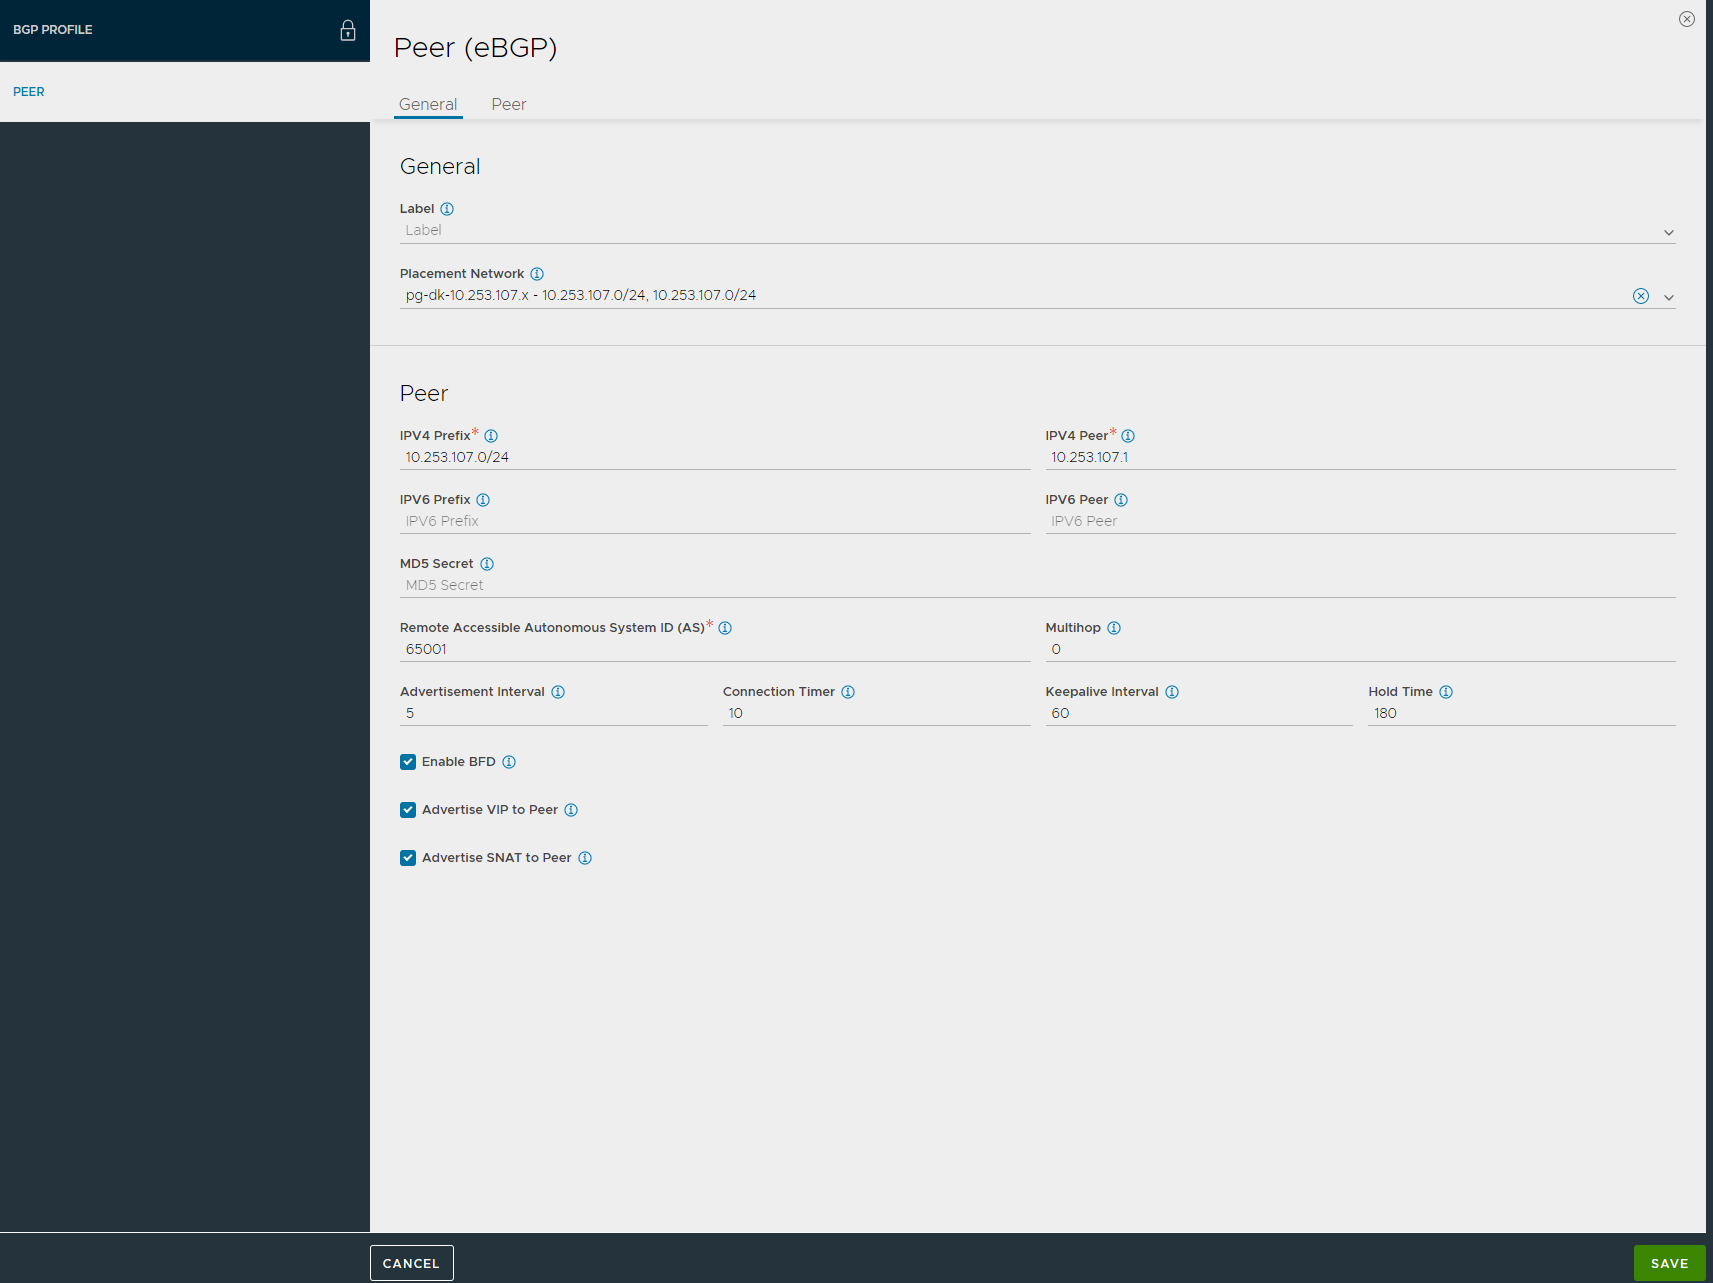
구성
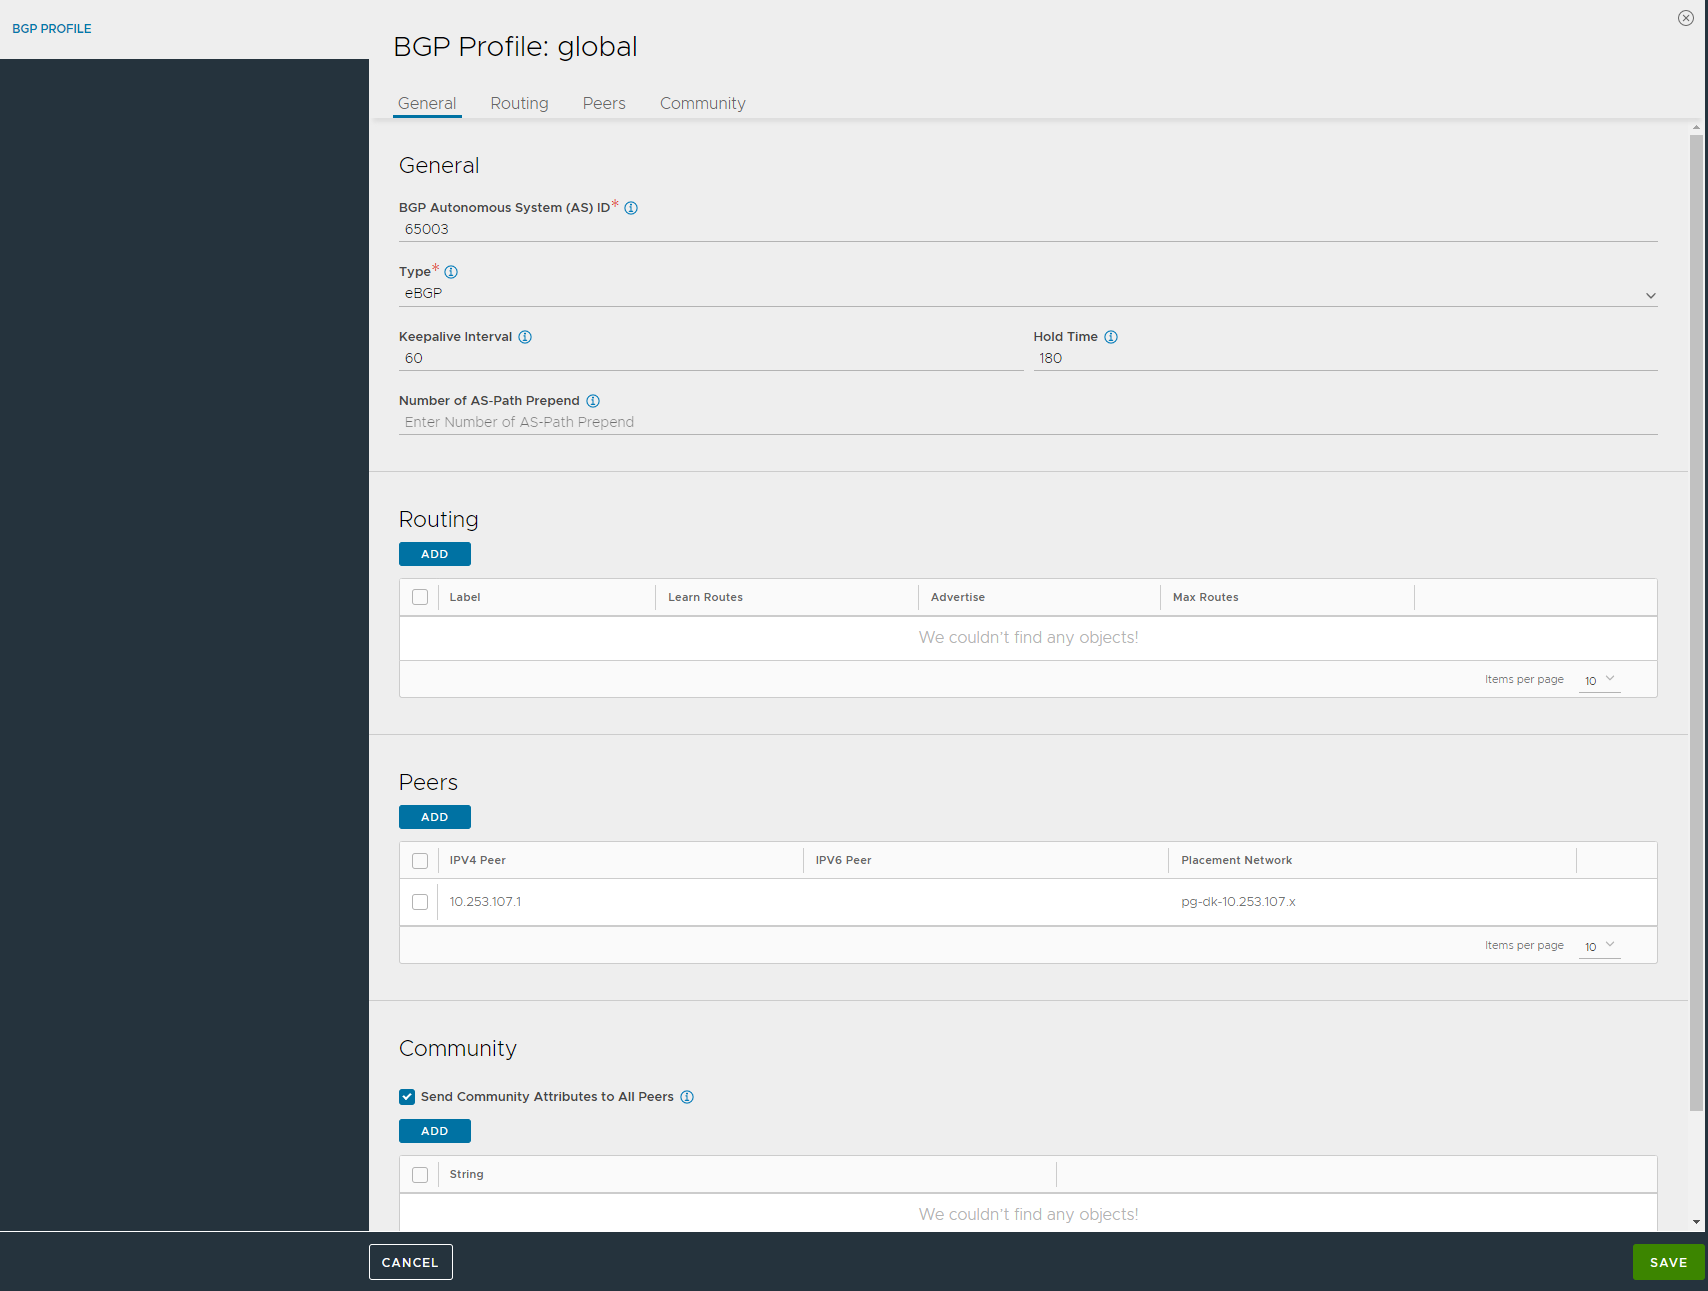
AVI에서 BGP 설정
BGP 설정
BGP 설정
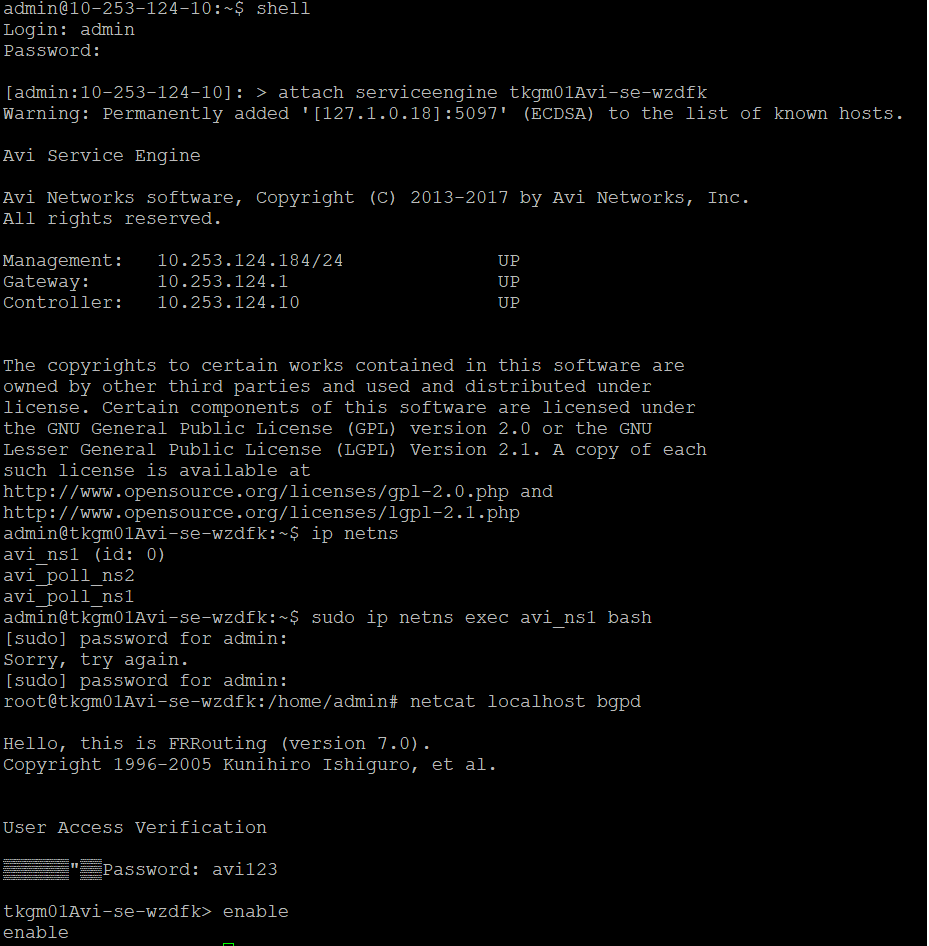
SE에 접속 해서 BGP 상태를 확인 한다.
 1
 2
 3
 4
 5
 6
 7
 8
 9
10
11
12
13
14
## AVI Controller SSH 접속
shell
admin / { password}
## 서비스 엔진 접속
attach serviceengine tkcdevAvi-se-jpjbe
ip netns
## 서비스 엔진 bash 접속
sudo ip netns exec avi_ns1 bash
## BGP 확인
netcat localhost bgpd
enable
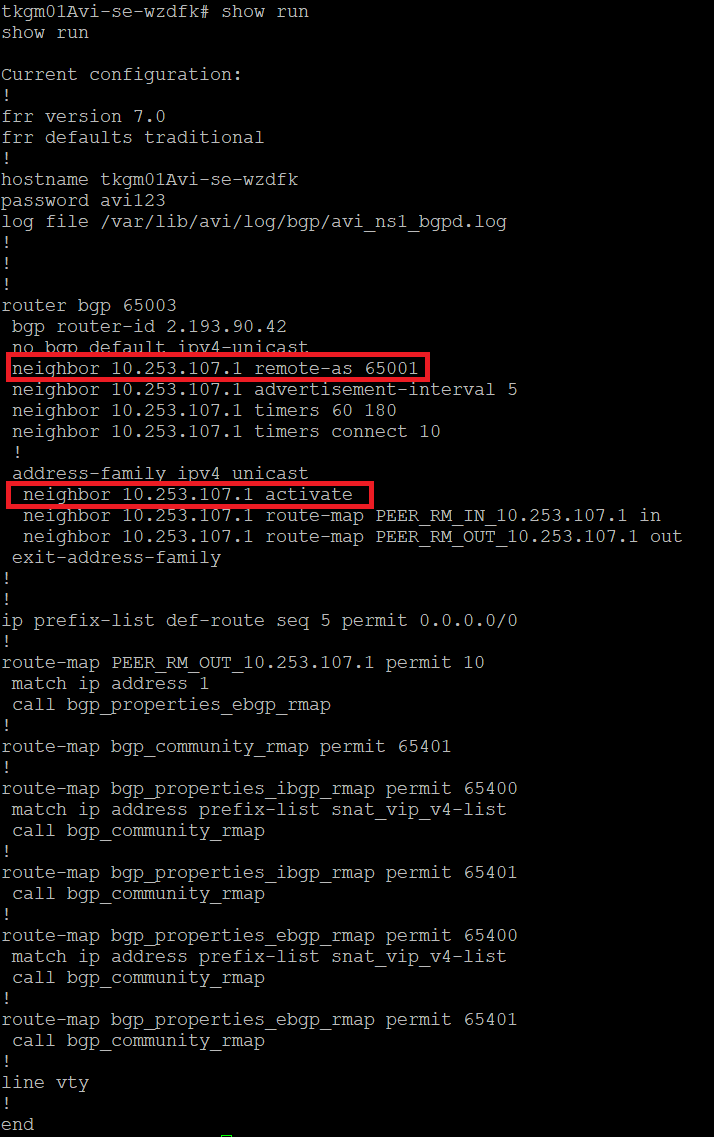
show run
show bgp summary
BGP 상태 확인
BGP 상태 확인
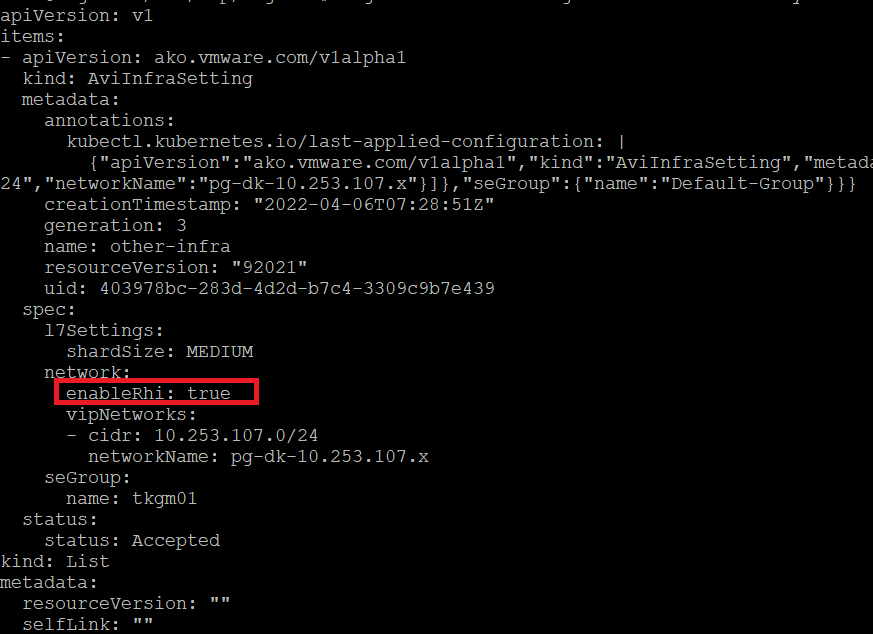
RHI Enabled
1
kubectl patch aviinfrasettings other-infra --type 'json' -p '[{"op":"replace","path":"/spec/network/enableRhi","value":true}]'
Rhi Enable
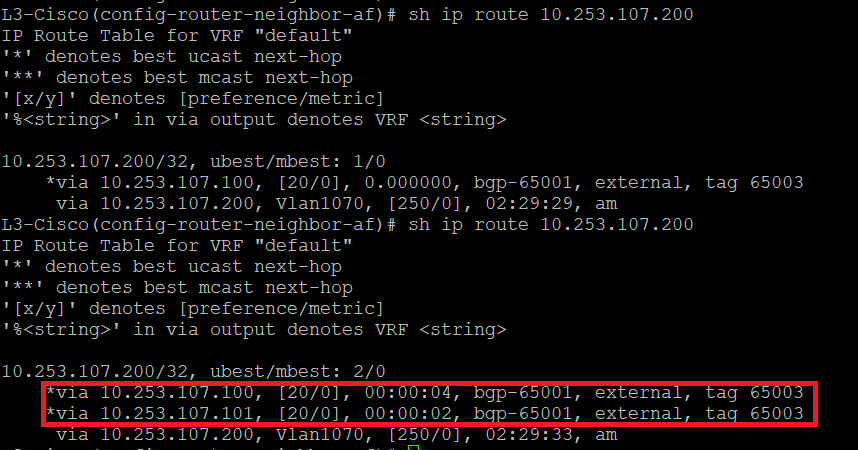
스위치에서 라우팅 확인
BGP 라우팅
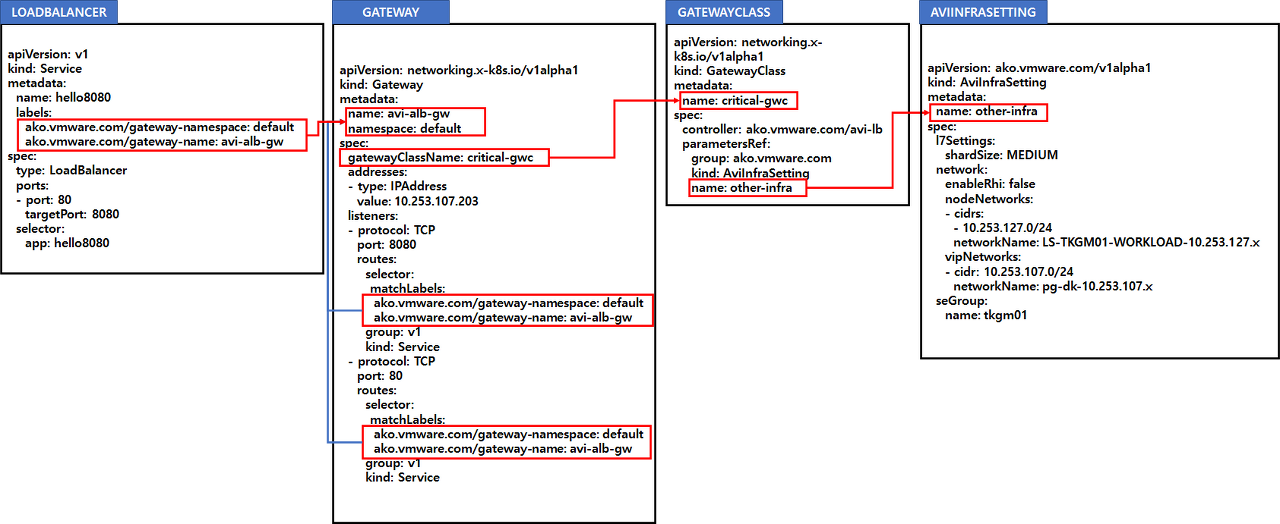
GATEWAY를 사용하는 이유는 여러개의 LoadBalancer의 IP를 하나의 IP로 설정하고 Port를 사용하기 위해서다.
SVC를 생성하면 생성하는 만큼 IP가 생성이 되기때문에 IP를 공통으로 사용을 할 수 있다.
GATEWAYCLASS 연계
구성을 하기 위해서는 클러스터에서 servicesAPI: true 를 True로 변경 필요 및 AutoFQDN와 DefaultDomain이 필요하다.
위에서 언급한 AVIINFRASETTING을 한 후 GATEWAYCLASS를 생성한다.
 1
 2
 3
 4
 5
 6
 7
 8
 9
10
11
12
cat <<EOF | kubectl apply -f -
apiVersion: networking.x-k8s.io/v1alpha1
kind: GatewayClass
metadata:
  name: critical-gwc
spec:
  controller: ako.vmware.com/avi-lb
  parametersRef:
    group: ako.vmware.com
    kind: AviInfraSetting
    name: other-infra
EOF
GATEWAY 생성
 1
 2
 3
 4
 5
 6
 7
 8
 9
10
11
12
13
14
15
16
17
18
19
20
21
22
23
24
25
26
27
28
cat <<EOF | kubectl apply -f -
apiVersion: networking.x-k8s.io/v1alpha1
kind: Gateway
metadata:
  name: avi-alb-gw
  namespace: default
spec:
  gatewayClassName: critical-gwc
  listeners:
  - protocol: TCP
    port: 8080
    routes:
      selector:
       matchLabels:
        ako.vmware.com/gateway-namespace: default
        ako.vmware.com/gateway-name: avi-alb-gw
      group: v1
      kind: Service
  - protocol: TCP
    port: 80
    routes:
      selector:
       matchLabels:
        ako.vmware.com/gateway-namespace: default
        ako.vmware.com/gateway-name: avi-alb-gw
      group: v1
      kind: Service
EOF
만약에 LB IP를 지정 하고 싶다면. 아래와 같이 IP를 지정하면 된다.
 1
 2
 3
 4
 5
 6
 7
 8
 9
10
11
12
13
14
15
16
17
18
19
20
21
22
23
24
25
26
27
28
29
30
31
cat <<EOF | kubectl apply -f -
apiVersion: networking.x-k8s.io/v1alpha1
kind: Gateway
metadata:
  name: avi-alb-gw
  namespace: default
spec:
  gatewayClassName: critical-gwc
  addresses:
  - type: IPAddress
    value: 10.253.107.203
  listeners:
  - protocol: TCP
    port: 8080
    routes:
      selector:
       matchLabels:
        ako.vmware.com/gateway-namespace: default
        ako.vmware.com/gateway-name: avi-alb-gw
      group: v1
      kind: Service
  - protocol: TCP
    port: 80
    routes:
      selector:
       matchLabels:
        ako.vmware.com/gateway-namespace: default
        ako.vmware.com/gateway-name: avi-alb-gw
      group: v1
      kind: Service
EOF
테스트
1
2
kubectl create deploy hello --image= paulbouwer/hello-kubernetes:1.7 --replicas= 3 --port= 8080
kubectl expose deployment hello --type= LoadBalancer --port= 80 --target-port= 8080 -l 'ako.vmware.com/gateway-namespace=default' ,'ako.vmware.com/gateway-name=avi-alb-gw'
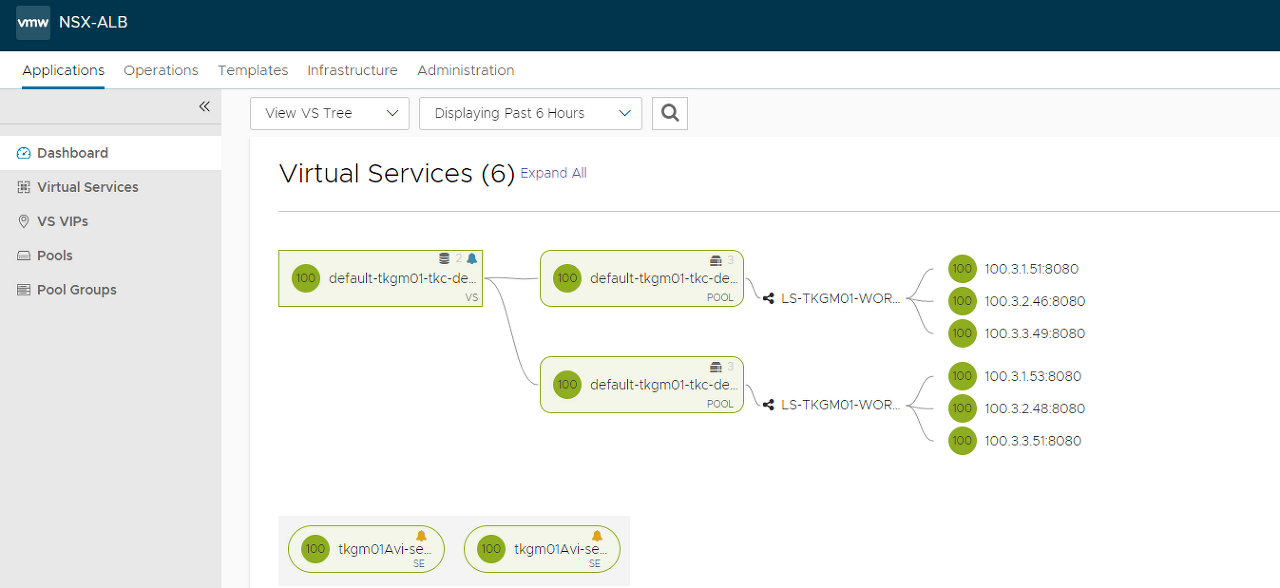
아래와 같이 동일한 IP로 두개의 SVC를 동일한 IP로 Port(80 , 8080)만 다른게 구성 할 수 있다.
VS상태#1
VS상태#2
VS상태#2