오픈시프트 오리진(OpenShift Origin)은 오픈시프트 온라인, 오픈시프트 데디케이티드, 오픈시프트 컨테이너 플랫폼에 사용되는 업스트림 커뮤니티 프로젝트이다. 도커 컨테이너 패키징 코어와 쿠버네티스 컨테이너 클러스터 관리 기능을 기반에 두고 개발된 오리진은 애플리케이션 수명 관리 기능과 데브옵스 도구를 통해 증강된다. 오리진은 오픈 소스 애플리케이션 컨테이너 플랫폼을 제공한다. 오리진 프로젝트의 모든 소스 코드는 깃허브에서 아파치 라이선스 (버전 2.0)을 통해 이용이 가능하다.[4]
오픈시프트 온라인(OpenShift Online)은 레드햇의 퍼블릭 클라우드 애플리케이션 개발 및 호스팅 서비스이다. 온라인은 오리진 프로젝트 소스 코드의 버전 2를 제공하였으며, 아파치 라이선스 버전 2.0 하에서 이용이 가능하다.[5] 온라인은 리소스 할당 기어(gear) 하에서 구동되는 미리 빌드된 카트리지를 통해 다양한 언어, 프레임워크 데이터베이스를 지원한다. 개발자들은 오픈시프트 카트리지 API를 통해 다른 언어, 데이터베이스, 구성 요소를 추가할 수 있다.[6] 오픈시프트 3의 선호로 사용이 권장되지 않는다(deprecated).
오픈시프트 데디케이티드(OpenShift Dedicated)는 레드햇의 매니지드 프라이빗 클러스터 기능으로, 도커가 제공하는 애플리케이션 컨테이너의 코어를 기반으로 빌드되며 레드햇 엔터프라이즈 리눅스의 토대 위에 쿠버네티스가 제공하는 오케스트레이션 및 관리가 포함되어 있다. 아마존 웹 서비스(AWS)와 구글 클라우드 플랫폼(GCP) 마켓플레이스를 통해 이용이 가능하다.
오픈시프트 컨테이너 플랫폼(OpenShift Container Platform)은 레드햇의 사내(on-premises) 프라이빗 PaaS 제품으로, 도커가 제공하는 애플리케이션 컨테이너의 코어를 기반으로 빌드되며 레드햇 엔터프라이즈 리눅스의 토대 위에 쿠버네티스가 제공하는 오케스트레이션 및 관리가 포함되어 있다.
참고문헌
Common
Component Name
Cluster Name
BaseDomain
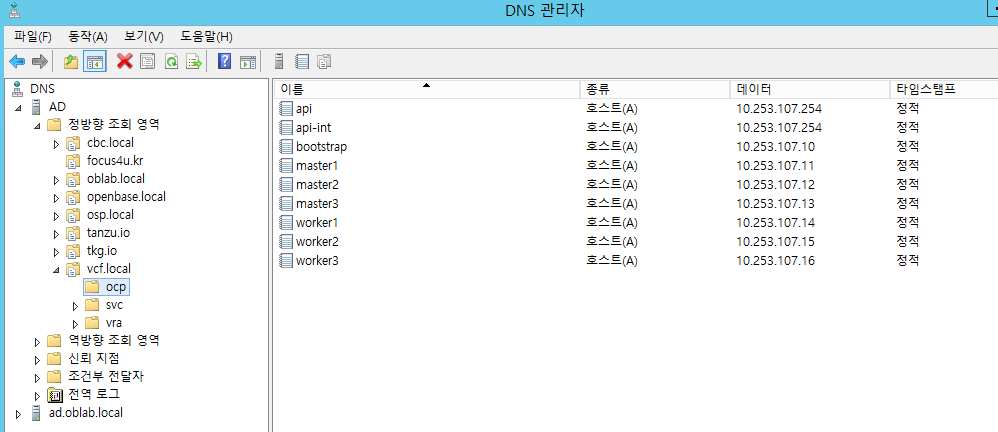
A Record
api
openshift
vcf.local
10.253.107.254
api-int
openshift
vcf.local
10.253.107.254
*
apps
openshift
vcf.local
10.253.107.10
console-openshift-console
apps
openshift
vcf.local
10.253.107.10
*
apps
openshift
vcf.local
10.253.107.10
bootstrap
openshift
vcf.local
10.253.107.10
master0
openshift
vcf.local
10.253.107.11
master1
openshift
vcf.local
10.253.107.12
master2
openshift
vcf.local
10.253.107.13
worker1
openshift
vcf.local
10.253.107.14
worker2
openshift
vcf.local
10.253.107.15
worker3
openshift
vcf.local
10.253.107.16
DNS 구성
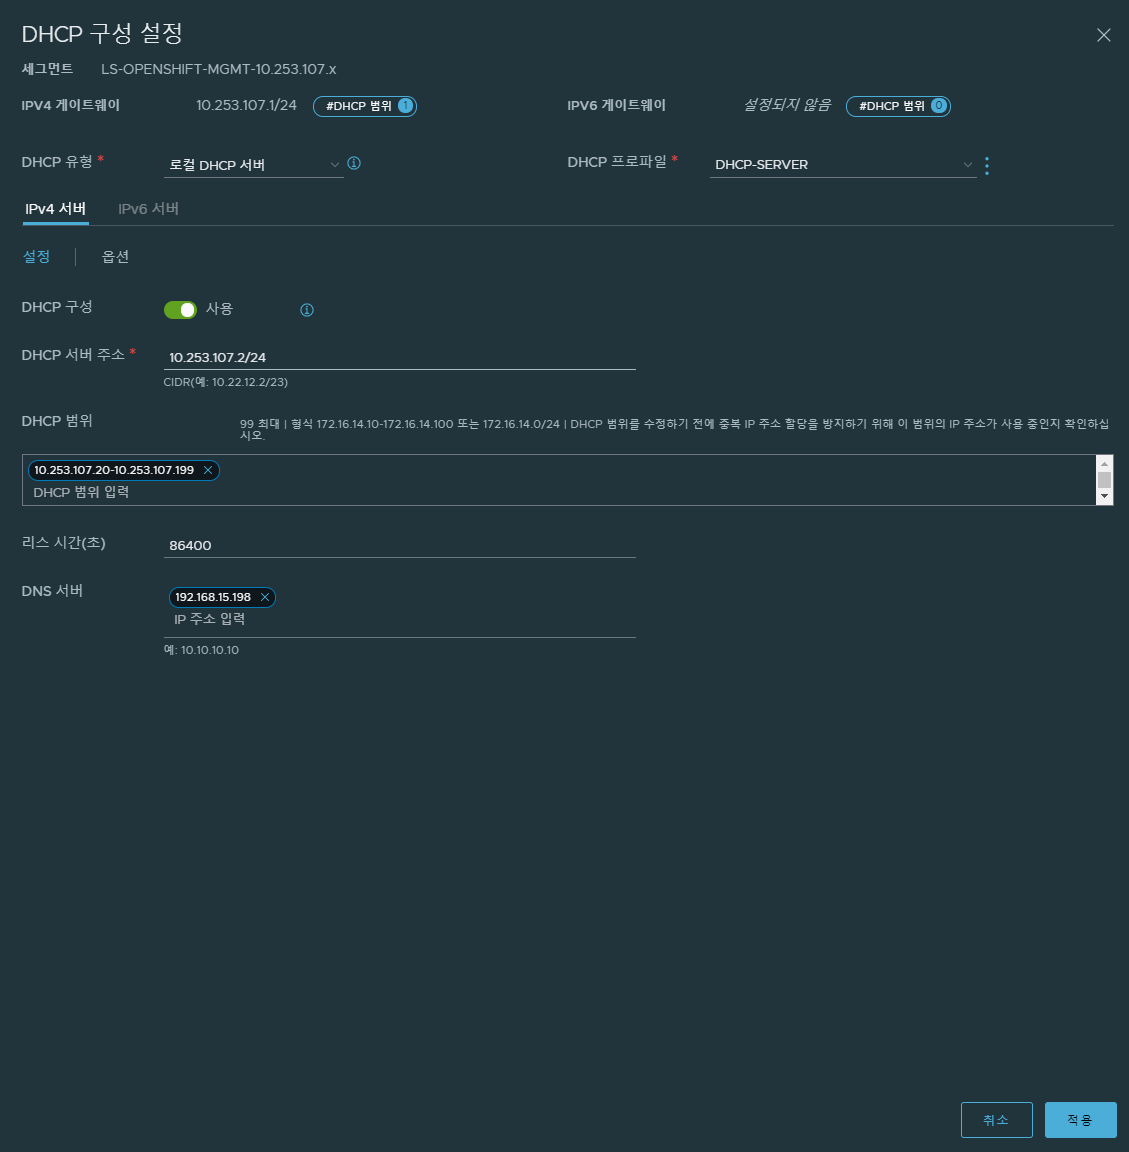
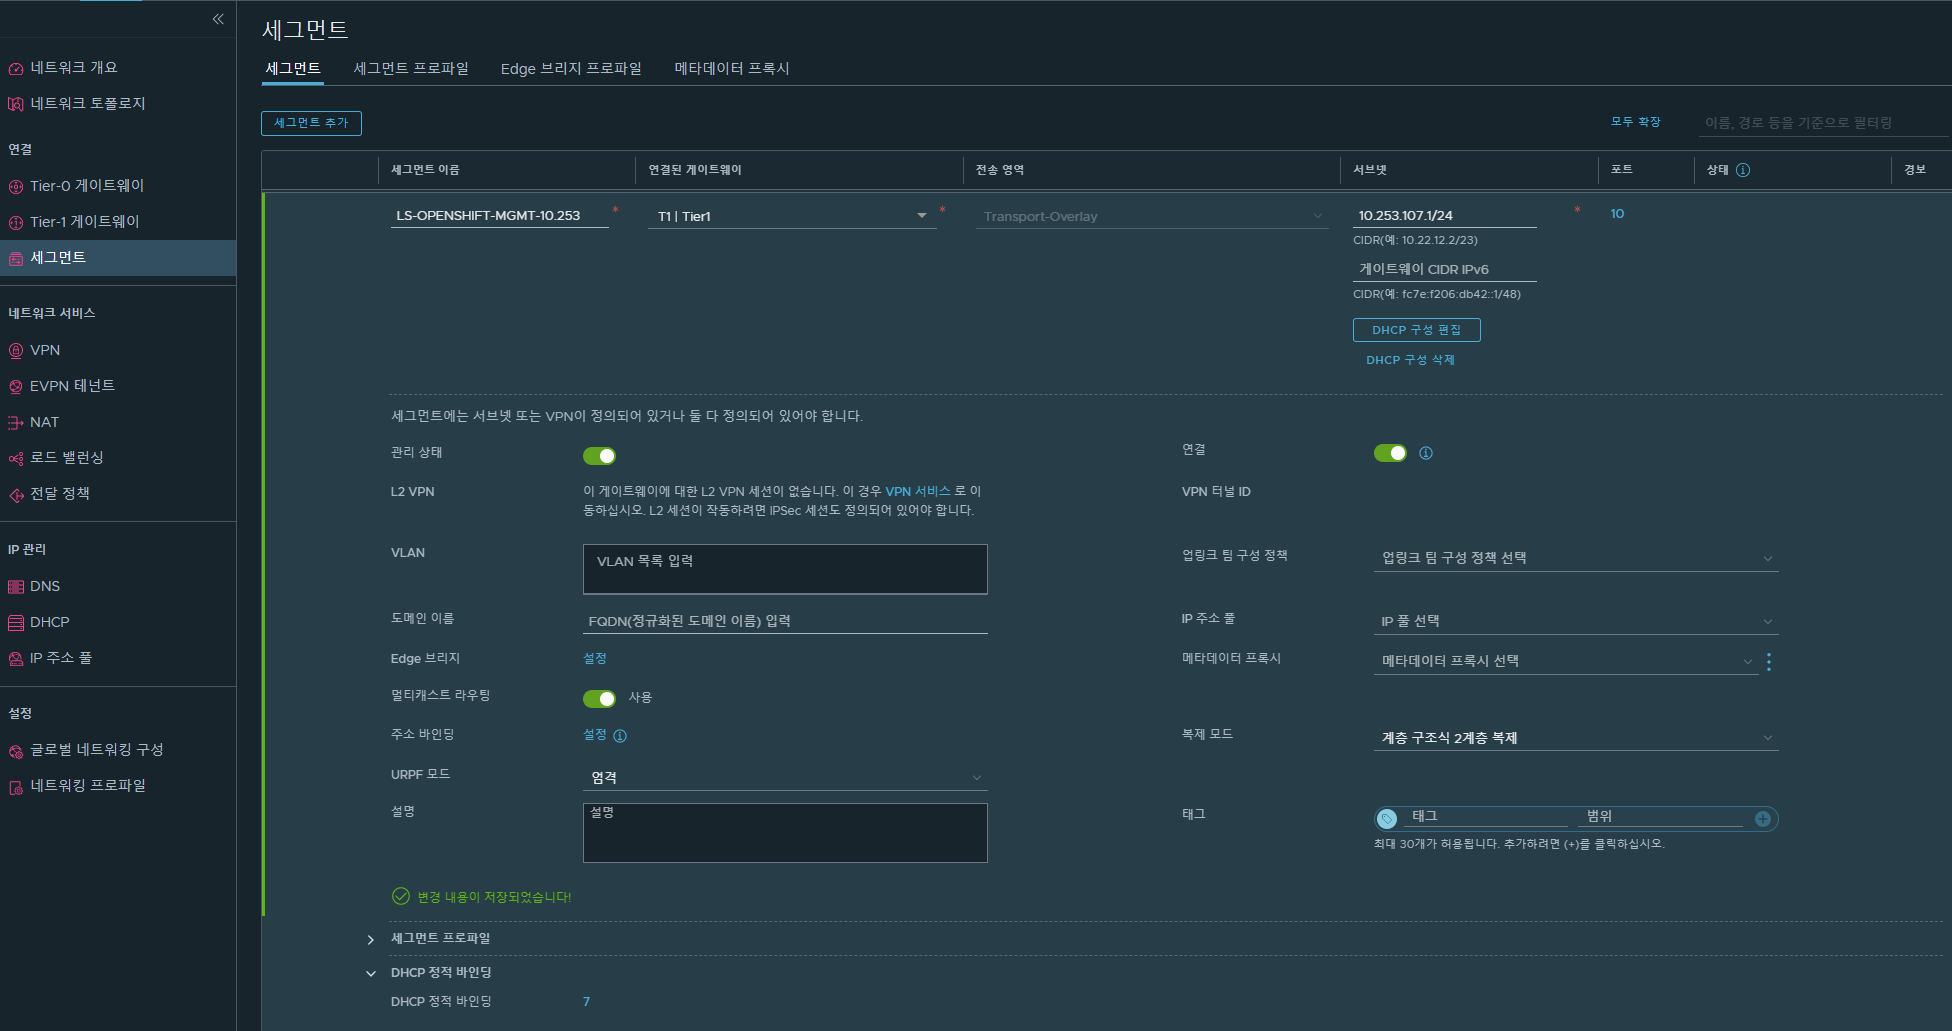
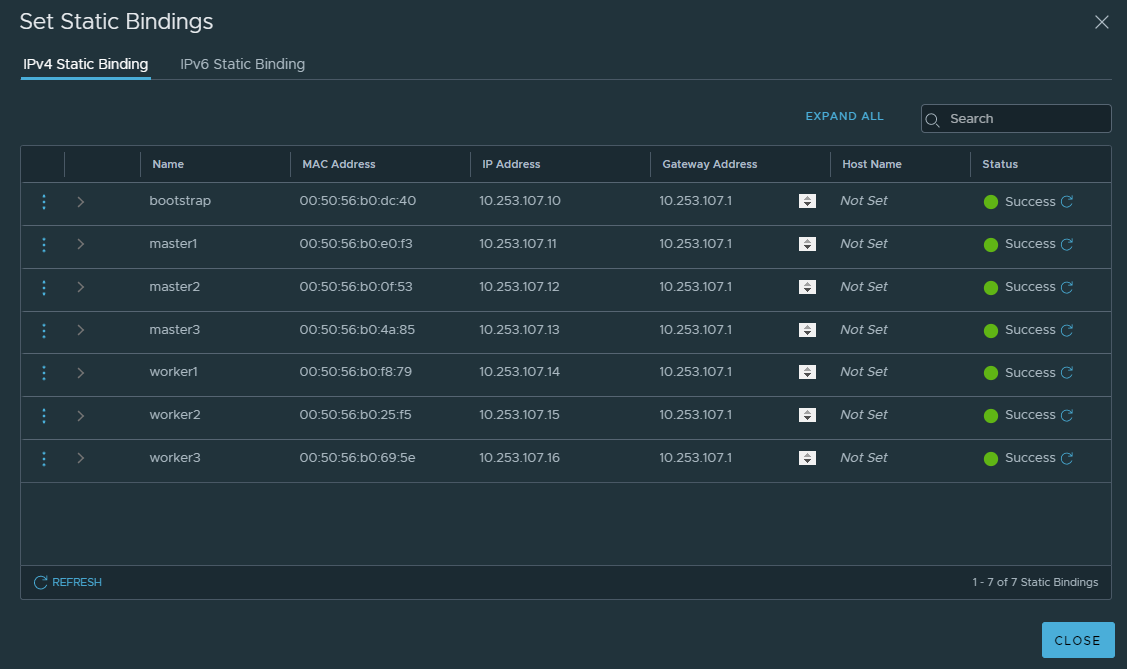
DHCP 구성 - NSXT로 구성을 하였다.
DHCP 구성#1
DHCP 구성#2
DHCP 구성#3
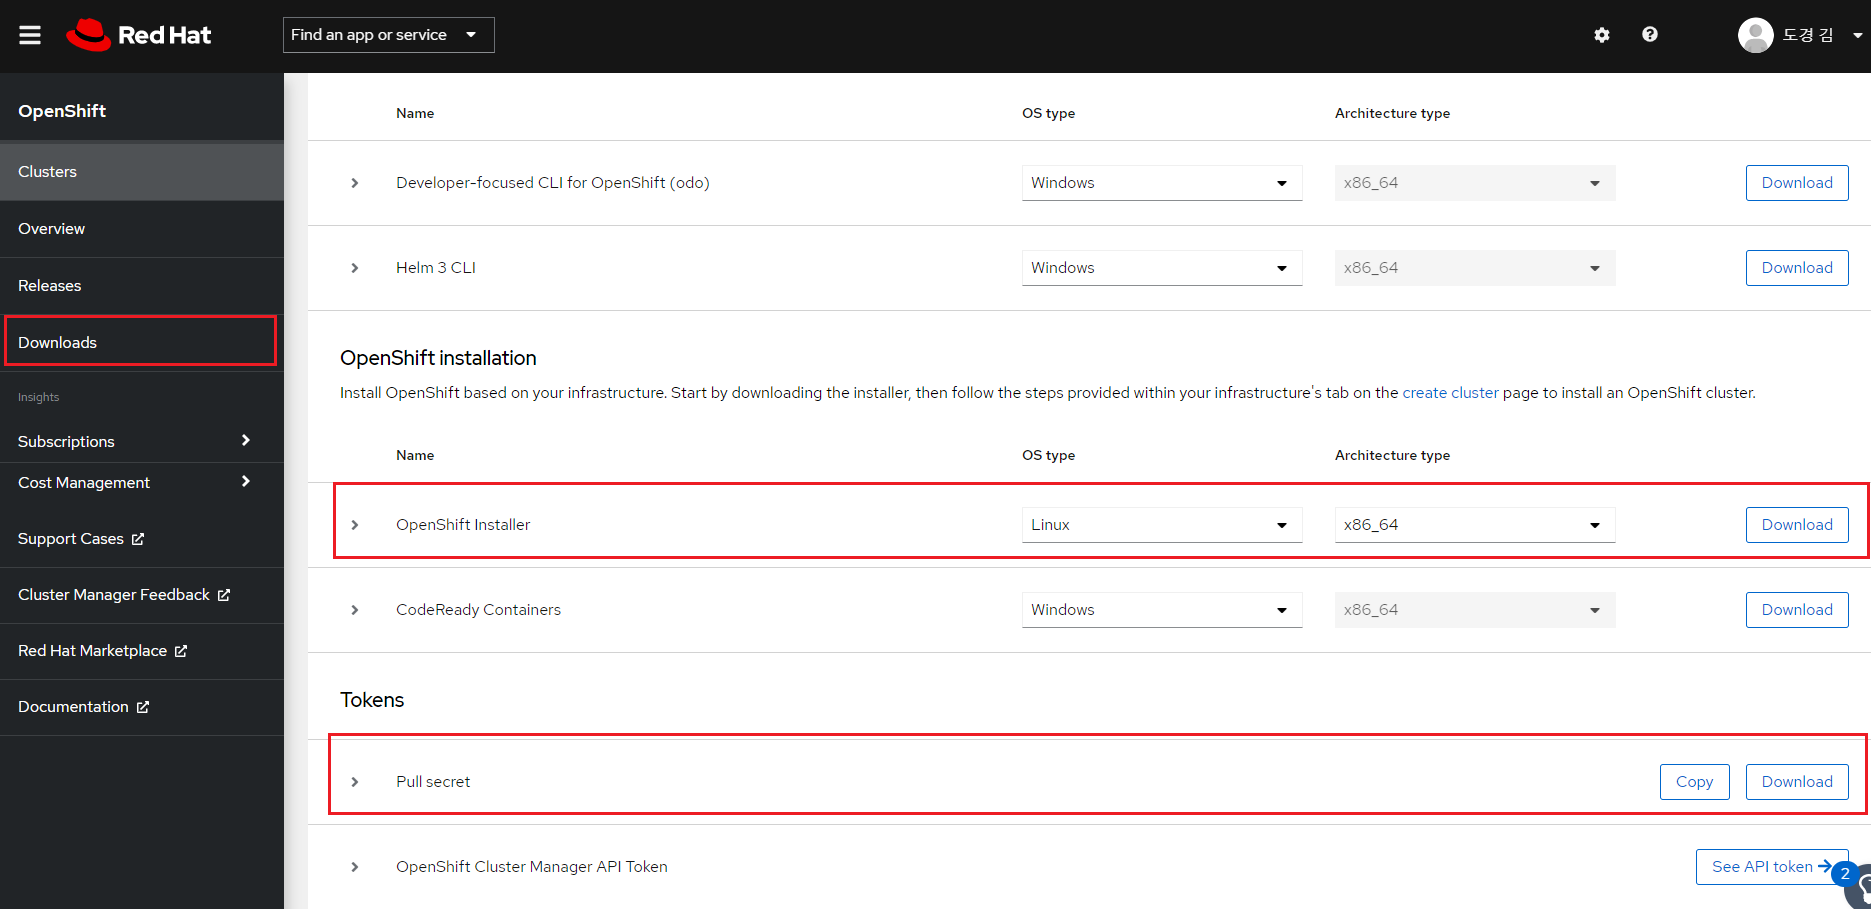
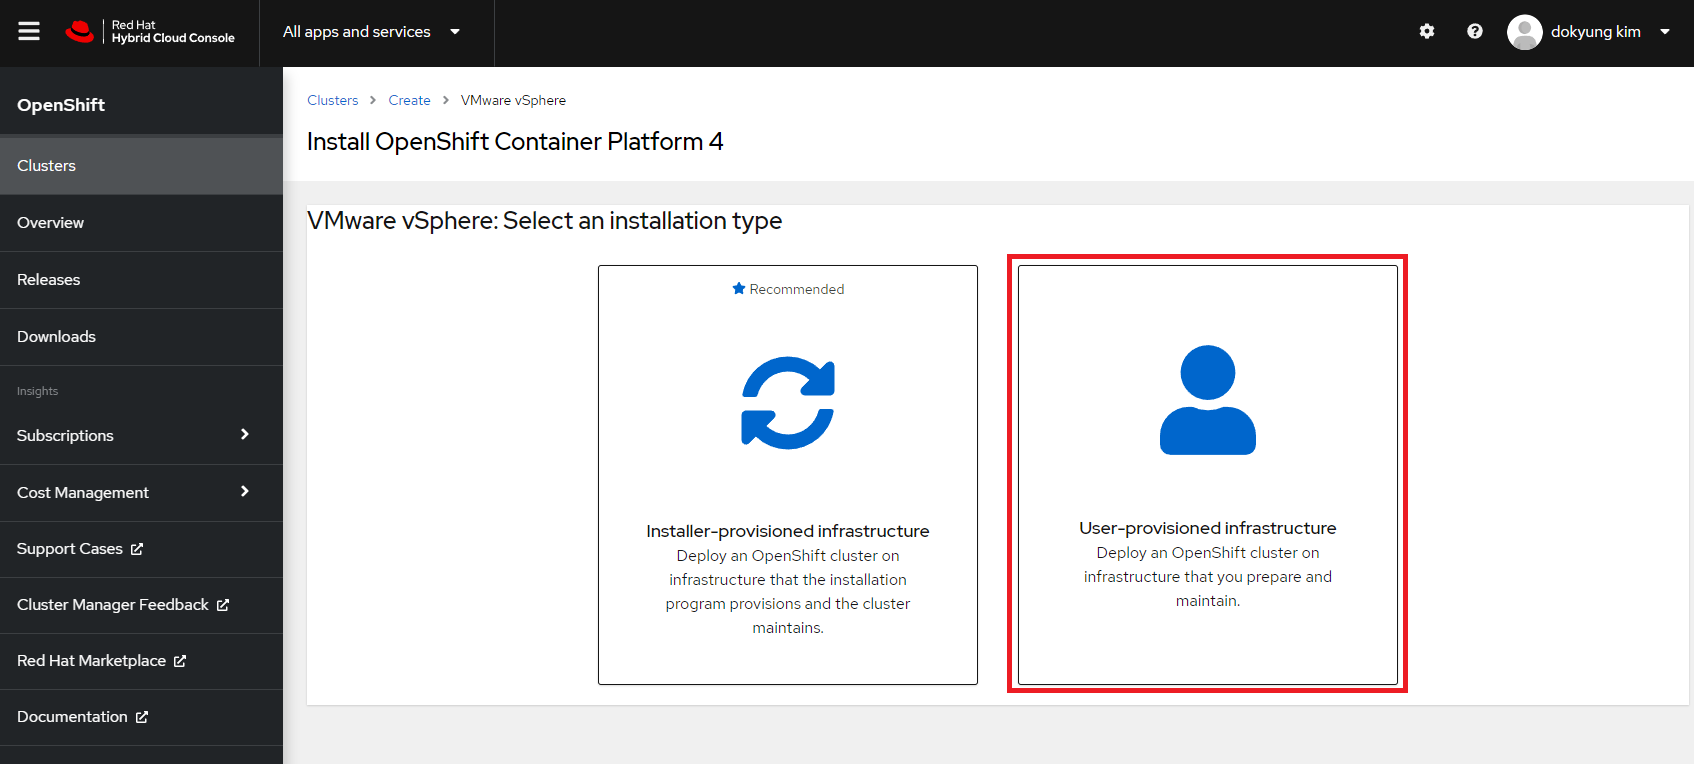
OC를 다운로드 하기 위해 redhat에 가입 하고 Login 필요
OC 다운로드 링크
OC 다운로드#1
OC 다운로드#2
압축을 해제 하고 환경변수를 별도로 구성하지 않게 /usr/local/bin 에다가 copy를 한다.
1
2
3
4
5
6
7
8
9
tar -xzvf openshift-client-linux.tar.gz

tar -xzvf openshift-install-linux.tar.gz

mv oc kubectl openshift-install /usr/local/bin

oc version

openshift-install version
sshkeygen을 생성 한다.
1
2
3
4
5
ssh-keygen -t ed25519 -N '' -f ~/.ssh/id_rsa
eval " $( ssh-agent -s) "
ssh-add ~/.ssh/id_rsa
1
2
3
4
5
openssl s_client -servername vcsa01.vcf.local -connect vcsa01.vcf.local:443 | openssl x509 | tee ca.crt

cp ca.crt /usr/local/share/ca-certificates/

update-ca-certificates
1
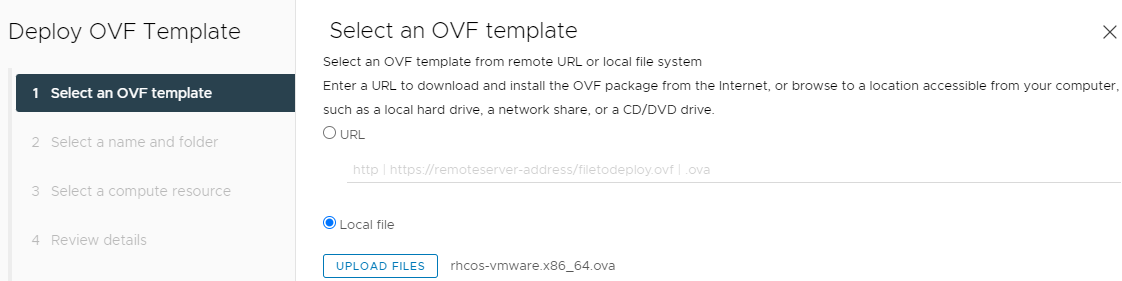
wget https://mirror.openshift.com/pub/openshift-v4/dependencies/rhcos/latest/latest/rhcos-vmware.x86_64.ova
또는 아래와 같이 GUI에서 다운로드 받을 수 있다.
RHCOS OVA GUI 다운로드#2
RHCOS OVA GUI 다운로드#2
RHCOS OVA GUI 다운로드#3
RHCOS OVA GUI 다운로드#4
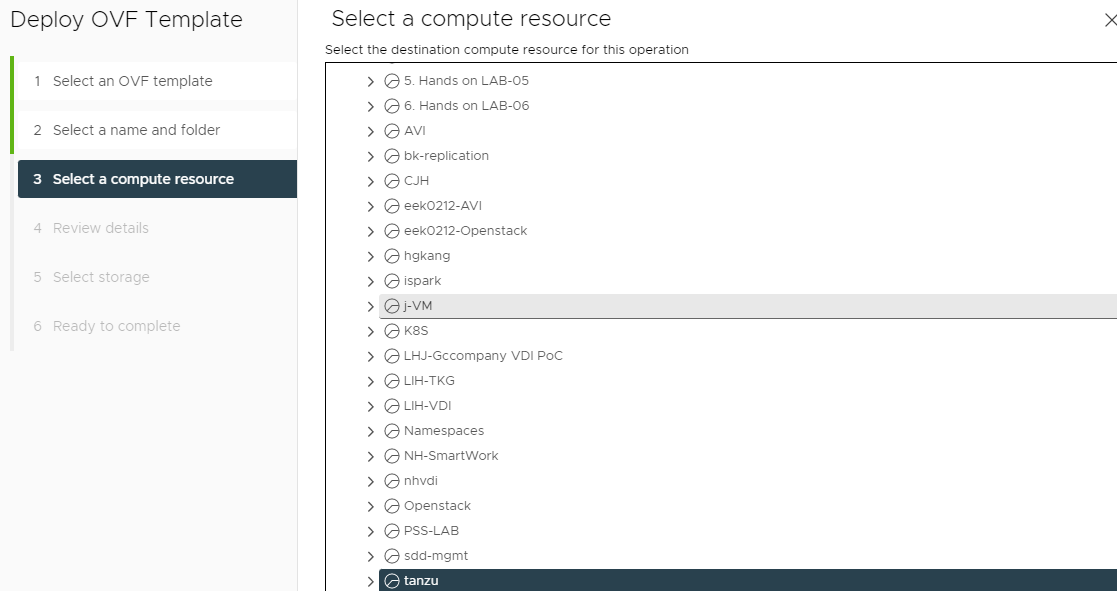
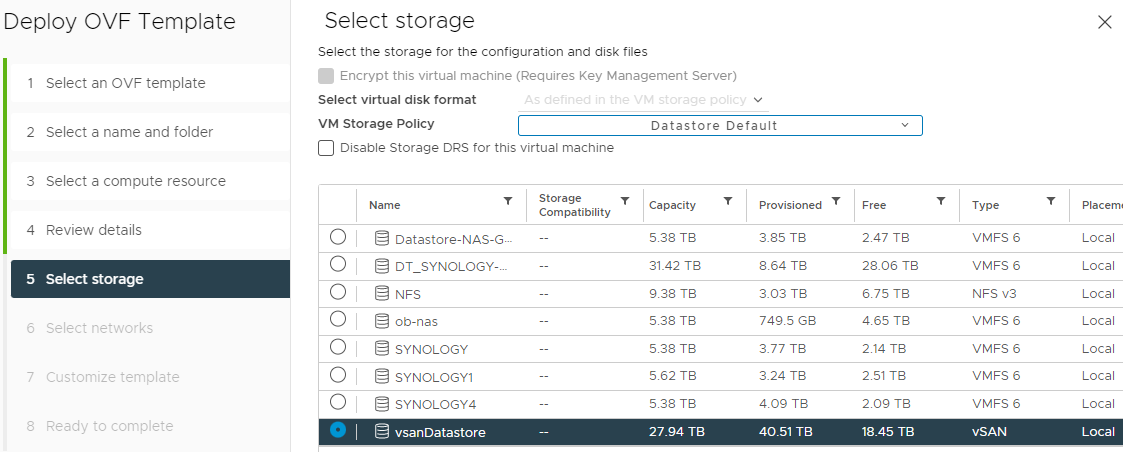
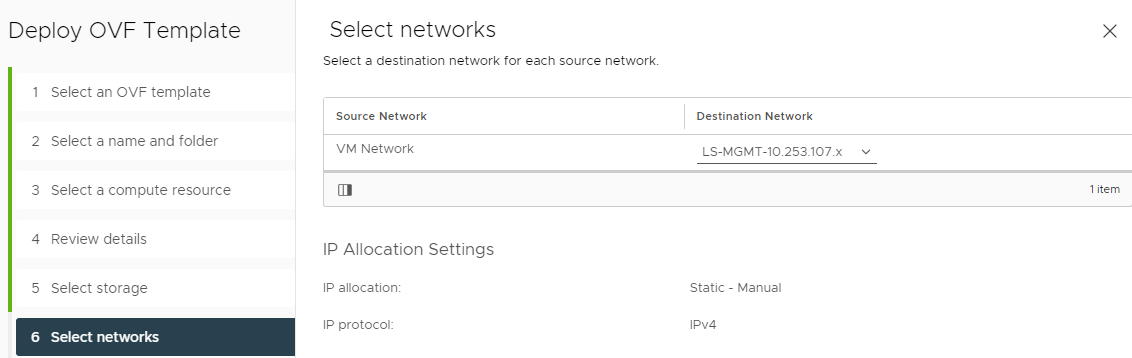
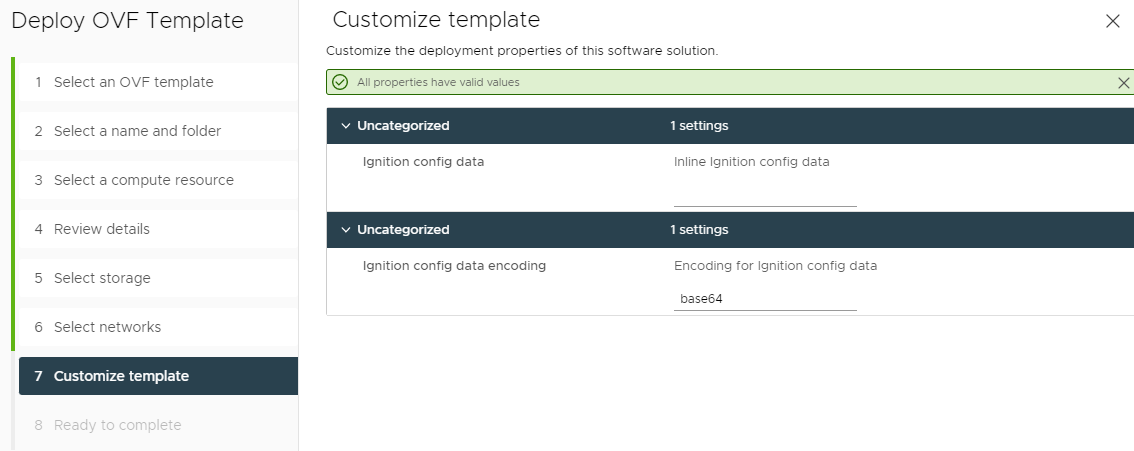
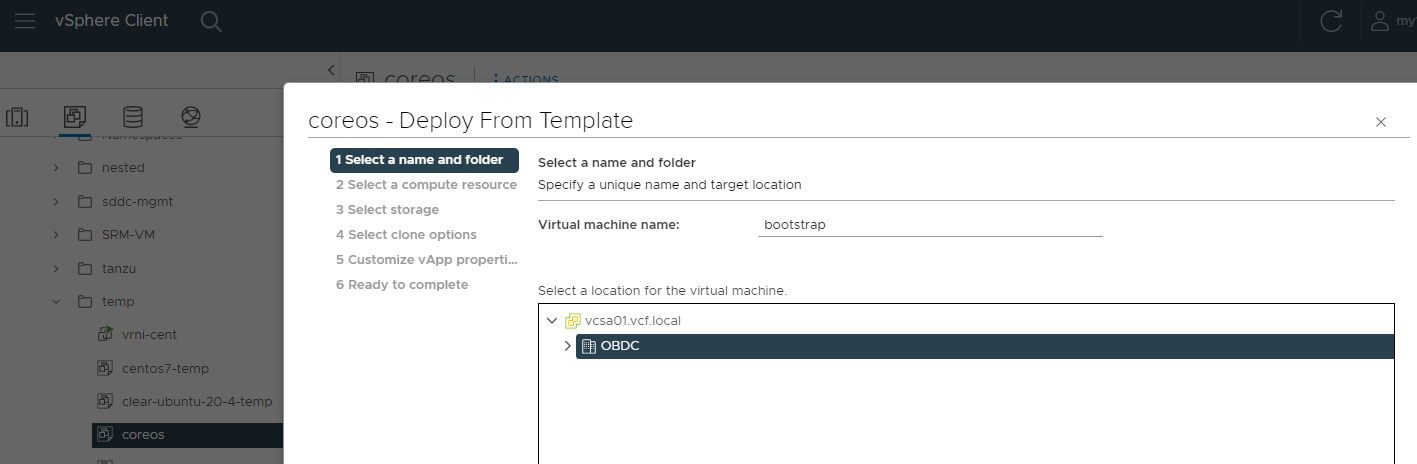
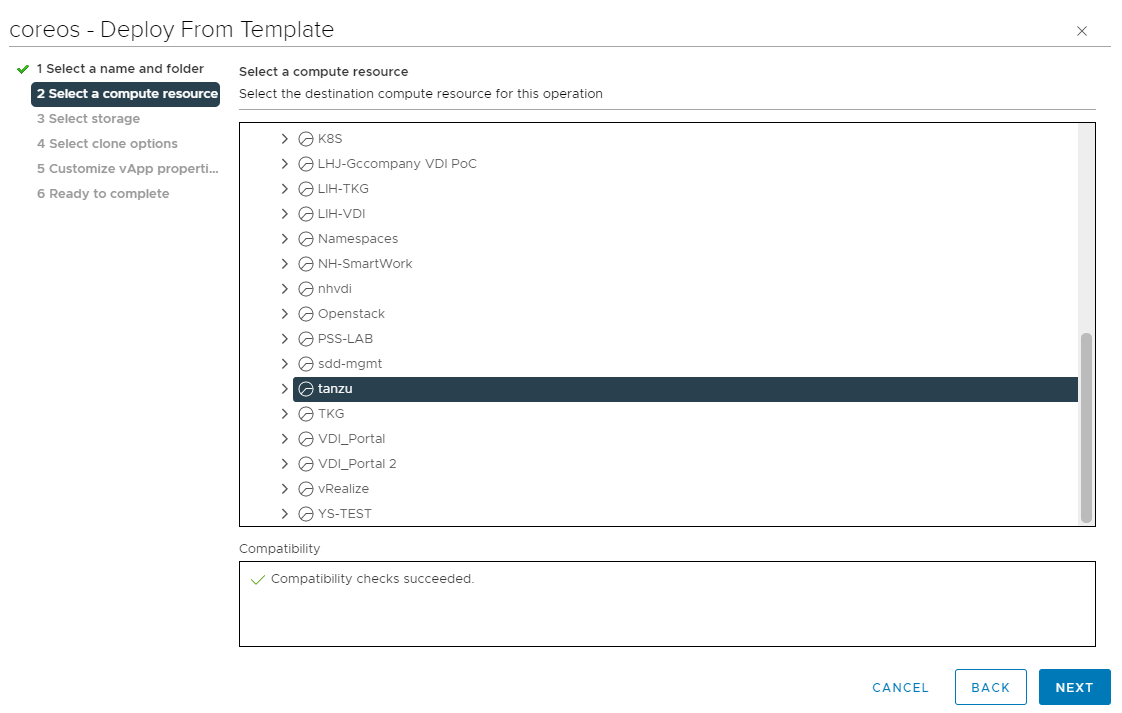
vSphere Temp Upload#1
vSphere Temp Upload#2
vSphere Temp Upload#3
vSphere Temp Upload#4
vSphere Temp Upload#5
vSphere Temp Upload#6
vSphere Temp Upload#7
vSphere Temp Upload#8
install-config.yaml 참조
 1
 2
 3
 4
 5
 6
 7
 8
 9
10
11
12
13
14
15
16
17
18
19
20
21
22
23
24
25
26
27
28
29
30
31
32
33
34
35
36
37
38
39
40
41
42
apiVersion: v1
baseDomain: vcf.local
compute:
- architecture: amd64
  hyperthreading: Enabled
  name: worker
  platform: {}
  replicas: 3
controlPlane:
  architecture: amd64
  hyperthreading: Enabled
  name: master
  platform: {}
  replicas: 3
metadata:
  creationTimestamp: null
  name: ocp
networking:
  clusterNetwork:
  - cidr: 10.128.0.0/14
    hostPrefix: 23
  machineNetwork:
  - cidr: 10.0.0.0/16
  networkType: OpenShiftSDN
  serviceNetwork:
  - 172.30.0.0/16
platform:
  vsphere:
    apiVIP: 10.253.107.254
    cluster: OBCLUSTER
    datacenter: OBDC
    defaultDatastore: vsanDatastore
    ingressVIP: 10.253.107.253
    network: LS-MGMT-10.253.107.x
    password: Openbase!234
    username: administrator@vsphere.local
    vCenter: vcsa01.vcf.local
  fips: false
publish: External
pullSecret: 'full secret 넣어줘야함'
sshKey: |
  ssh-ed25519 AAAAC
ocp 실행
1
2
3
mkdir ocp
cp install-config.yaml ocp
openshift-install create install-config --dir= ocp
Manifest 변경
 1
 2
 3
 4
 5
 6
 7
 8
 9
10
11
12
13
14
15
16
17
18
19
20
openshift-install create manifests --dir ocp

cd ~/ocp/openshift
rm -rf 99_openshift-cluster-api_master-*
rm -rf 99_openshift-cluster-api_worker-machineset-0.yaml

cd ~/ocp/manifests/

vi cluster-scheduler-02-config.yml

apiVersion: config.openshift.io/v1
kind: Scheduler
metadata:
  creationTimestamp: null
  name: cluster
spec:
  mastersSchedulable: false    ### true > false change
  policy:
    name: ""
status: {}
ignition 실행
1
openshift-install create ignition-configs --dir ocp
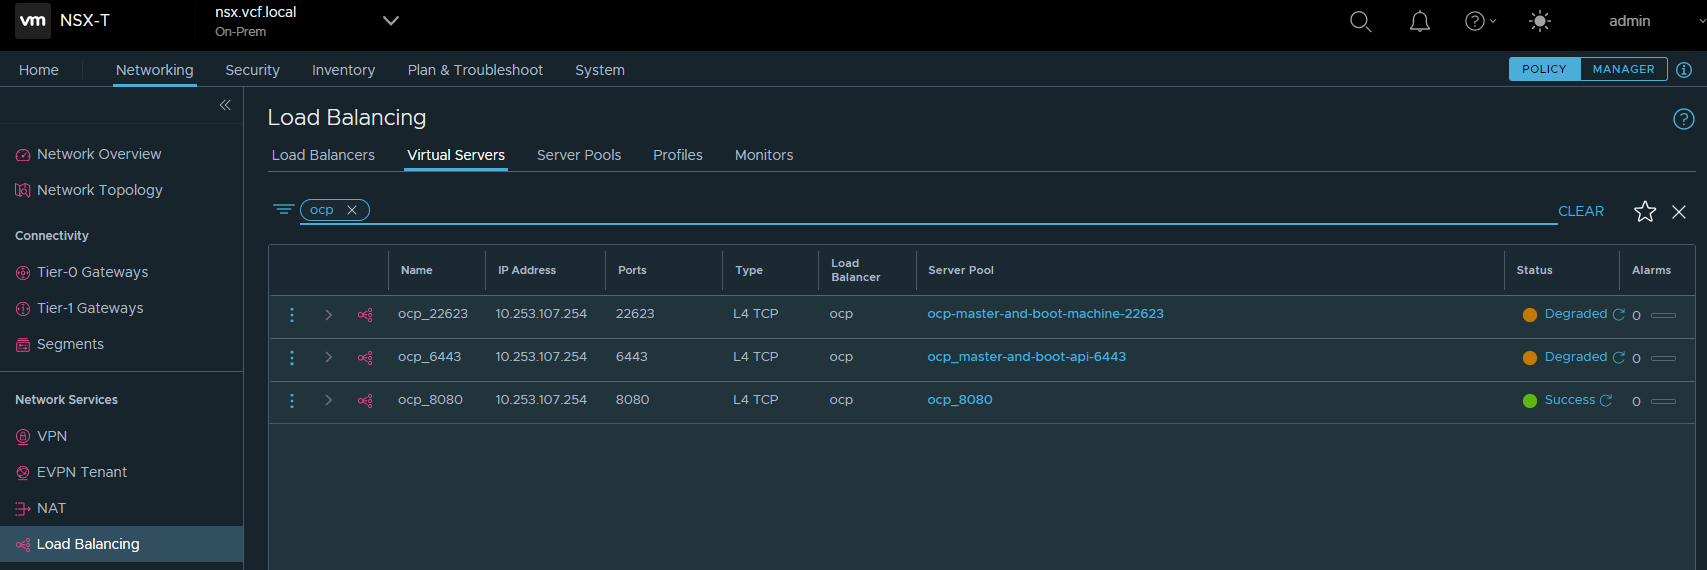
L4 VIP로 설정 필요
 1
 2
 3
 4
 5
 6
 7
 8
 9
10
11
12
13
14
cat << EOF | tee append-bootstrap.ign
{
  "ignition": {
    "config": {
      "merge": [
        {
          "source": "http://10.253.107.254:8080/bootstrap.ign" ## L4 VIP로 변경
        }
      ]
    },
    "version": "3.1.0"
  }
}
EOF
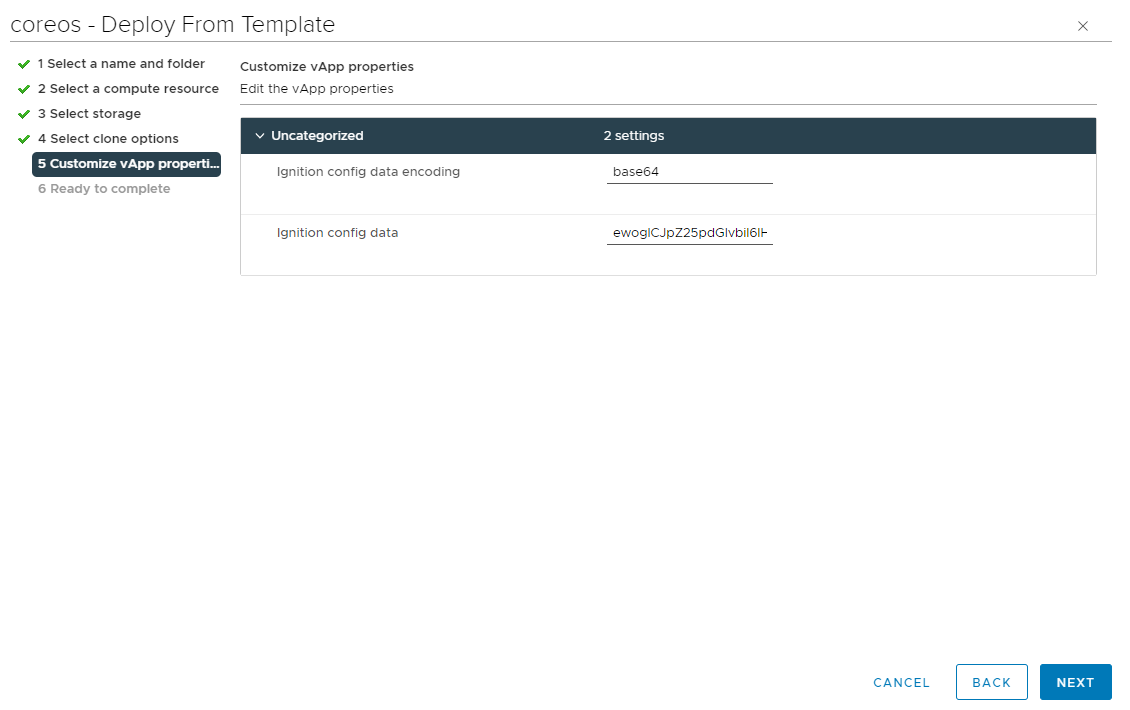
BASE64 실행
1
2
3
base64 -w0 append-bootstrap.ign > append-bootstrap.64
base64 -w0 master.ign > master.64
base64 -w0 worker.ign > worker.64
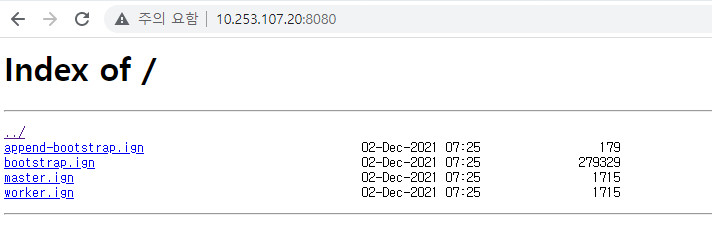
웹 구성에서 파일을 다운로드 할 수 있게 file 폴더 구성 후 ign을 복사 한다.
1
2
3
mkdir -p /usr/share/nginx/html/files
cp *.ign /usr/share/nginx/html/files/
chmod 644 /usr/share/nginx/html/files/*.ign
NGINX 설치
 1
 2
 3
 4
 5
 6
 7
 8
 9
10
11
12
13
14
15
16
17
18
19
20
21
22
23
24
25
26
27
28
29
30
31
32
33
apt update && apt upgrade -y
make로 설치
apt install gcc libpcre3 libpcre3-dev libssl-dev make -y
mkdir -p /var/tmp/src && cd /var/tmp/src
wget http://nginx.org/download/nginx-1.20.2.tar.gz
tar -xzf nginx-1.20.2.tar.gz
cd nginx-1.20.2
./configure --prefix= /var/www/html --sbin-path= /usr/sbin/nginx --conf-path= /etc/nginx/nginx.conf --http-log-path= /var/log/nginx/access.log --error-log-path= /var/log/nginx/error.log --with-pcre --lock-path= /var/lock/nginx.lock --pid-path= /var/run/nginx.pid --with-http_ssl_module --with-http_image_filter_module= dynamic --modules-path= /etc/nginx/modules --with-http_v2_module --with-stream= dynamic --with-http_addition_module --with-http_mp4_module --with-stream
make
make install
vi /lib/systemd/system/nginx.service
[ Unit]
Description = The NGINX HTTP and reverse proxy server
After = syslog.target network-online.target remote-fs.target nss-lookup.target
Wants = network-online.target
[ Service]
Type = forking
PIDFile = /var/run/nginx.pid
ExecStartPre = /usr/sbin/nginx -t
ExecStart = /usr/sbin/nginx
ExecReload = /usr/sbin/nginx -s reload
ExecStop = /bin/kill -s QUIT $MAINPID
PrivateTmp = true
[ Install]
WantedBy = multi-user.target
nginx.conf 설정
 1
 2
 3
 4
 5
 6
 7
 8
 9
10
11
12
13
14
15
16
17
18
19
20
21
22
23
24
25
26
27
28
29
30
31
32
33
34
35
36
37
38
39
40
41
42
## 아래 내용 추가
vi etc/nginx/nginx.conf
worker_processes auto; ## 추가
error_log /var/log/nginx/error.log; ## 추가
pid /run/nginx.pid; ## 추가
include /etc/nginx/stream.conf.d/*.conf; ## 추가
http {
include mime.types;
default_type application/octet-stream;
log_format main '$remote_addr - $remote_user [$time_local] "$request" '
'$status $body_bytes_sent "$http_referer" '
'"$http_user_agent" "$http_x_forwarded_for"' ;
access_log logs/access.log main;
sendfile on;
#tcp_nopush on;
#keepalive_timeout 0;
keepalive_timeout 65;
#gzip on;
server {
listen 8081;
server_name localhost;
location / {
root html;
index index.html index.htm;
}
error_page 500 502 503 504 /50x.html;
location = /50x.html {
root html;
}
include /etc/nginx/conf.d/*.conf; ## 추가
}
웹 구성
 1
 2
 3
 4
 5
 6
 7
 8
 9
10
11
12
13
14
15
16
17
18
cat << EOF | tee /etc/nginx/conf.d/openshift.conf
server {
    listen       8080;
    server_name  localhost;


    location / {
        root   /usr/share/nginx/html/files;
        autoindex on;
    }

    error_page   500 502 503 504  /50x.html;
    location = /50x.html {
        root   /usr/share/nginx/html;
    }

}
EOF
nginx 테스트 및 실행
1
2
3
nginx -t
systemctl restart nginx
systemctl enable nginx
NGINX 확인
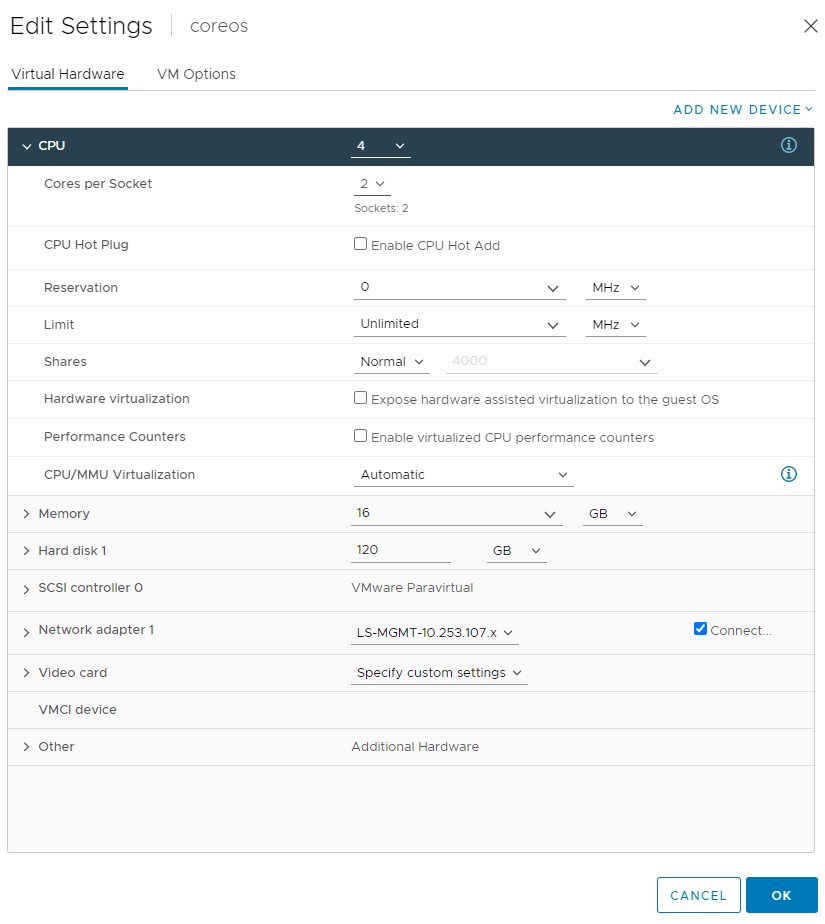
Temp를 활용하여 bootstrap , master 3개 , worker 3개를 배포한다.
Image 구성#1
Image 구성#2
Image 구성#3
Image 구성#4
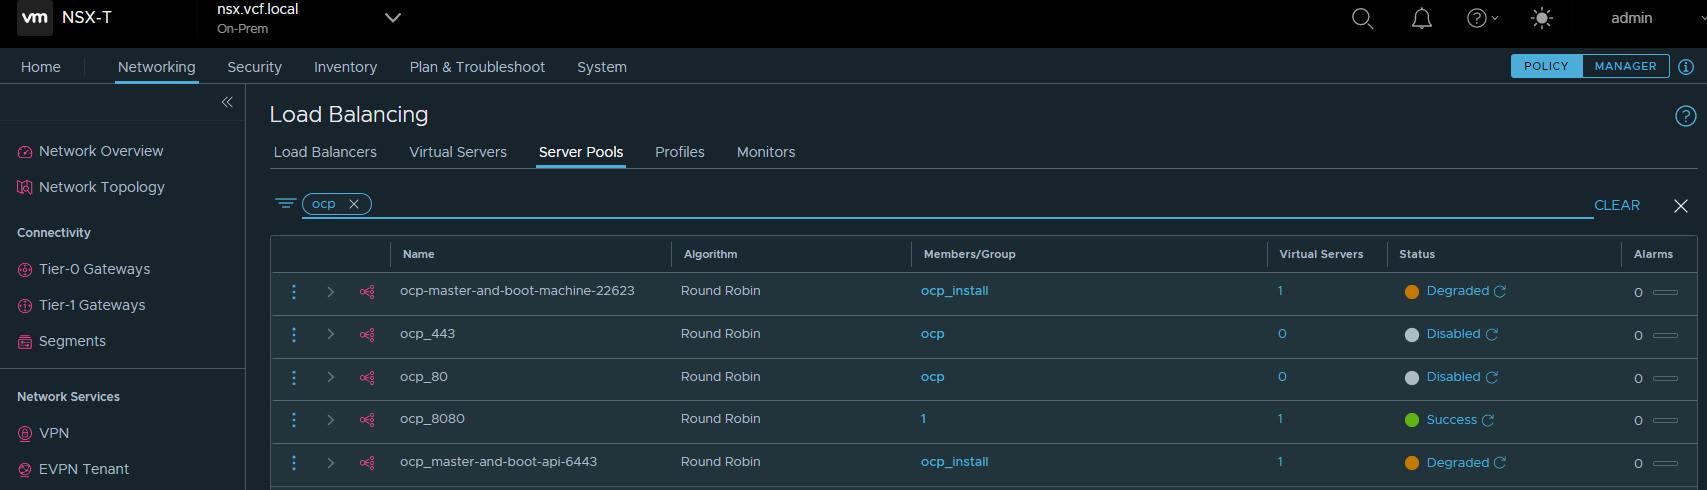
L4장비가 없을 경우 / L4장비가 있을 경우를 생각해서 NGINX도 포함 시킴
1
2
3
4
5
6
7
8
9
## 설명
ocp_8080 : jumphost ( nginx에서 파일을 땡기기 위해 구성)
## 배포 완료 후 bootstrap은 삭제 해도 됨
ocp-master-and-boot-machine-22623 : bootstrap 및 master
ocp_master-and-boot-api-6443: bootstrap 및 master
## Openshift는 Route를사용 하기 때문에 설정
ocp_443, ocp_80 : master 및 worker
L4 구성#1
L4 구성#2
 1
 2
 3
 4
 5
 6
 7
 8
 9
10
11
12
13
14
15
16
17
18
19
20
21
22
23
24
25
26
27
28
29
30
31
32
33
34
35
36
37
38
39
40
41
42
43
44
45
46
47
48
49
50
51
52
53
54
55
56
57
58
59
60
61
62
63
64
65
## LB 설정
cat << EOF | tee /etc/nginx/stream.conf.d/lb.conf

stream{
    upstream ocp_k8s_api {
        #round-robin;
        server 10.253.107.10:6443; #bootstrap
        server 10.253.107.11:6443; #master1
        server 10.253.107.12:6443; #master2
        server 10.253.107.13:6443; #master3
    }
    server {
        listen 6443;
        proxy_pass ocp_k8s_api;
    }


    upstream ocp_m_config {
        #round-robin;
        server 10.253.107.10:22623; #bootstrap
        server 10.253.107.11:22623; #master1
        server 10.253.107.12:22623; #master2
        server 10.253.107.13:22623; #master3
    }
    server {
        listen 22623;
        proxy_pass ocp_m_config;
    }

    upstream ocp_http {
        #round-robin;
        server 10.253.107.11:80; #master1
        server 10.253.107.12:80; #master2
        server 10.253.107.13:80; #master3
        server 10.253.107.14:80; #worker1
        server 10.253.107.15:80; #worker2
        server 10.253.107.16:80; #worker3
    }
    server{
        listen 80;
        proxy_pass ocp_http;
    }

    upstream ocp_https {
        #round-robin;
        server 10.253.107.11:443; #master1
        server 10.253.107.12:443; #master2
        server 10.253.107.13:443; #master3
        server 10.253.107.14:443; #worker1
        server 10.253.107.15:443; #worker2
        server 10.253.107.16:443; #worker3
    }
    server{
        listen 443;
        proxy_pass ocp_https;
    }
}
EOF


## nginx restart

nginx -t
systemctl restart nginx
1
2
3
4
5
6
7
8
export KUBECONFIG = <installation_directory>/auth/kubeconfig
예시
export KUBECONFIG = ~/ocp/auth/kubeconfig
oc whoami
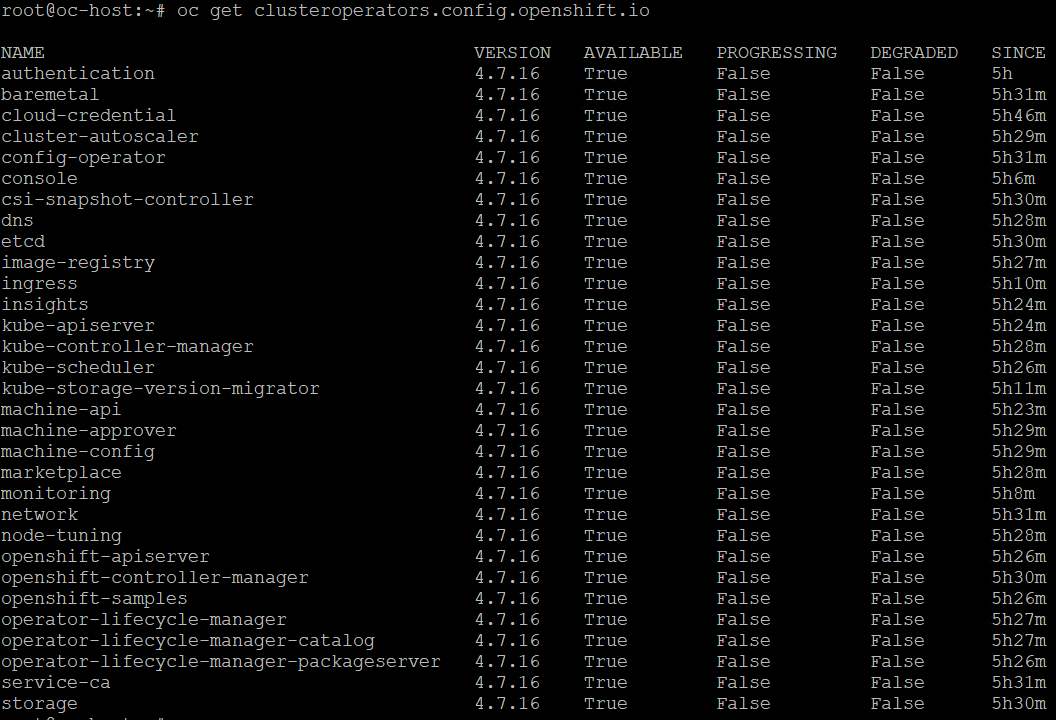
oc get clusterversion
완료#1
1
2
3
4
5
oc get clusteroperators

oc describe clusterversion

oc get clusterversion -o jsonpath='{.items[0].spec}{"\n"}'
완료#2
완료#3
1
2
3
4
5
6
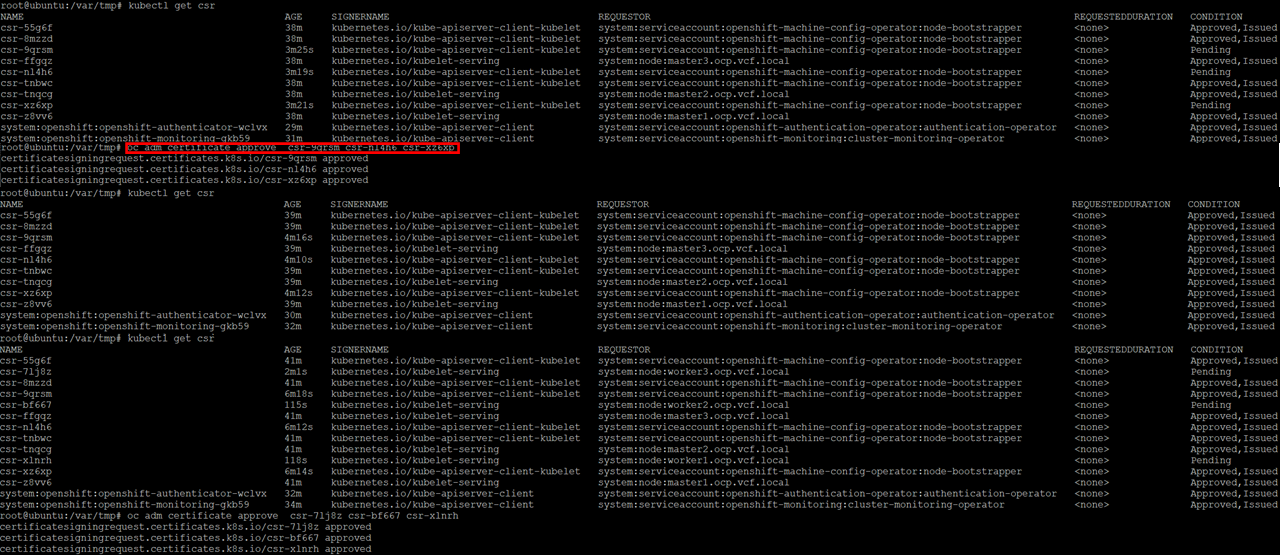
## PENDING 확인
kubectl get csr

## PENDING 확인 후 적용
oc adm certificate approve csr-bghmp csr-hd9x8 csr-hlngb
oc adm certificate approve csr-gpgv9 csr-n6lqm csr-zfws6
worker Node 추가
Local 또는 AD을 통해 계정을 관리 할 수 있다.
아래는 htpasswd를 사용 하는 방법의 대해서 구성 한다.
 1
 2
 3
 4
 5
 6
 7
 8
 9
10
11
12
13
## 우분투
apt install apache2-utils -y
# 유저 정보
# htpasswd -Bbc htpasswd {username} '{password}'
$ htpasswd -Bbc htpasswd my1208 'Passw0rd'
cat htpasswd
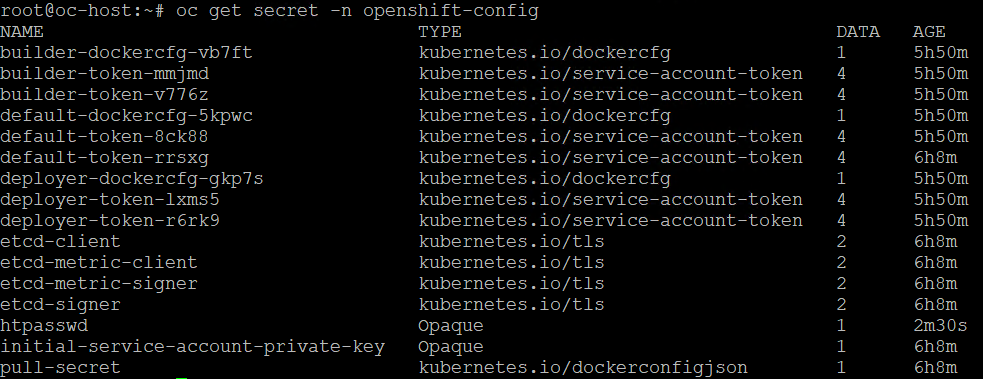
oc --user= admin create secret generic htpasswd \
= htpasswd -n openshift-config
oc get secret -n openshift-config
유저 추가
secret 확인
secret 추가
 1
 2
 3
 4
 5
 6
 7
 8
 9
10
11
12
13
14
15
16
17
18
19
20
21
22
23
24
25
26
27
28
29
cat << EOF | tee oauth-config.yaml
# oauth-config.yaml
apiVersion: config.openshift.io/v1
kind: OAuth
metadata:
name: cluster
spec:
identityProviders:
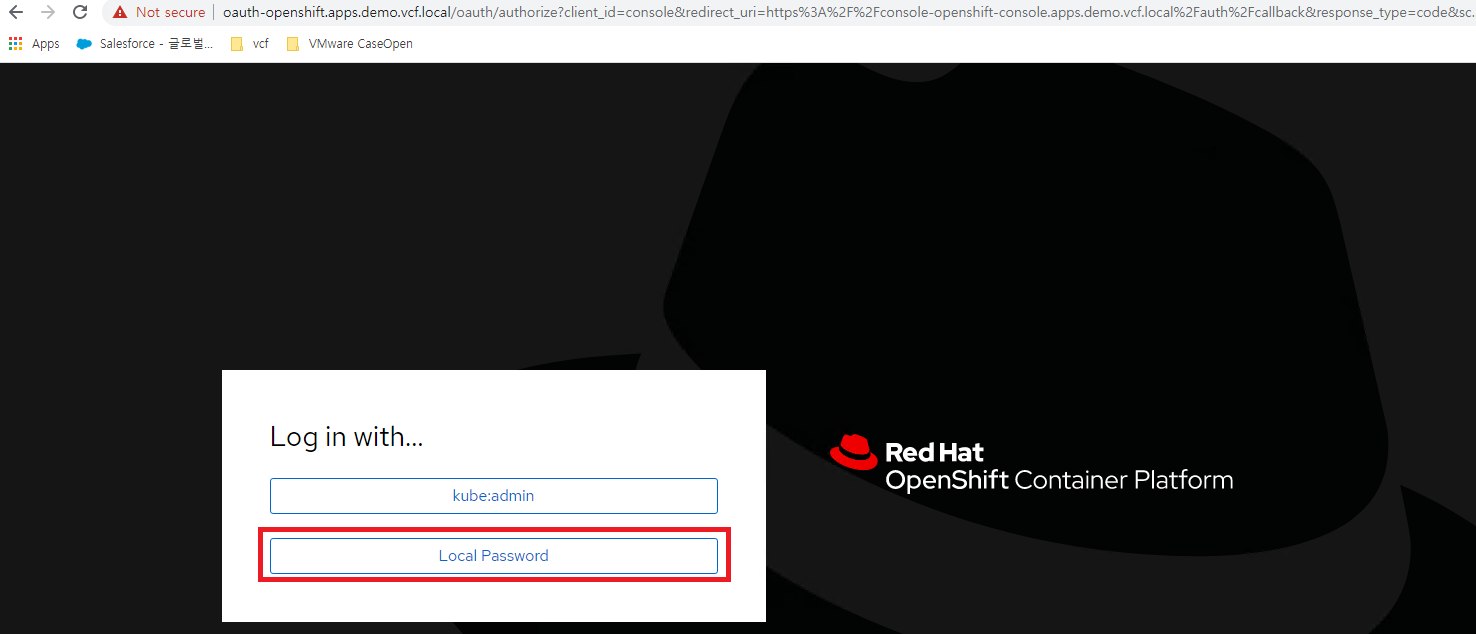
- name: Local Password
mappingMethod: claim
type: HTPasswd
htpasswd:
fileData:
name: htpasswd
EOF
oc replace -f oauth-config.yaml
## shows current user
oc whoami
## shows cluster web console URL
oc whoami --show-console
## shows cluster API URL
oc whoami --show-server
## shows current OAuth token
oc whoami --show-token
GUI 접속#1
GUI 접속#2
LDPAS를 구성하기 위한 configmap 생성
1
oc create configmap ca-config-map --from-file=ca.crt=/path/to/ca -n openshift-config
만약 LDAPS로 구성을 하지 않았으면 insecure: true, ca 항목을 삭제, url을 ldap으로 변경을 해주면 된다.
 1
 2
 3
 4
 5
 6
 7
 8
 9
10
11
12
13
14
15
16
17
18
19
20
21
22
23
24
25
26
27
28
oc apply -n openshift-config -f - << EOF
apiVersion: config.openshift.io/v1
kind: OAuth
metadata:
name: cluster
spec:
identityProviders:
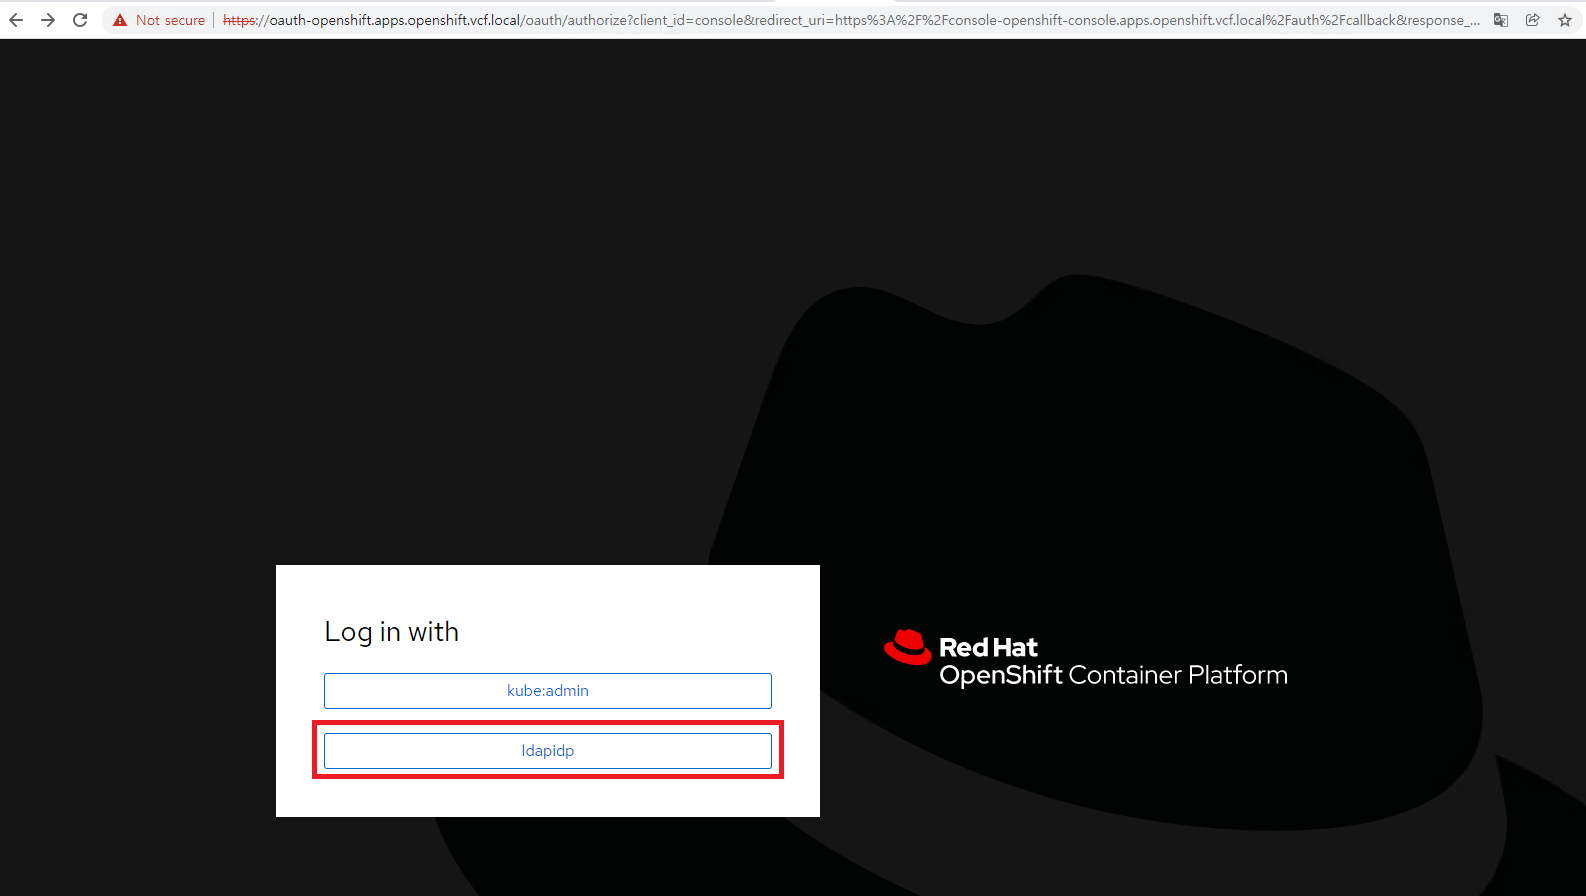
- name: ldapidp
mappingMethod: claim
type: LDAP
ldap:
attributes:
id:
- dn
email:
- mail
name:
- sAMAccountName
preferredUsername:
- sAMAccountName
bindDN: cn=administrator,cn=users,dc=tkg,dc=io
bindPassword:
name: ldap-secret
ca:
name: ca-config-map
insecure: false
url: "ldaps://tanzu-dns.tkg.io/ou=tanzu,dc=tkg,dc=io?sAMAccountName"
EOF
GUI 접속
 1
 2
 3
 4
 5
 6
 7
 8
 9
10
11
12
13
14
15
16
17
18
19
20
21
22
23
24
25
26
27
28
29
30
31
32
33
34
35
36
37
38
39
40
41
42
vi ldapsync.yaml
# LDAP is case insensitive, but OpenShift is not, so all LDAP parameters have been converted to lower case as per https://access.redhat.com/solutions/3232051 (under "Case Sensitivity")
kind: LDAPSyncConfig
apiVersion: v1
url: ldaps://tanzu-dns.tkg.io:636
insecure: false
ca: "/data/cert/ldapserver.pem" ### ldaps 인증서의 실제 위치 / 파일
bindDN: cn = administrator,cn= users,dc= tkg,dc= io
bindPassword: "Password"
rfc2307:
groupsQuery:
baseDN: "ou=tanzu,dc=tkg,dc=io"
scope: sub
filter: ( objectClass = group)
derefAliases: never
timeout: 0
pageSize: 0
groupUIDAttribute: dn
groupNameAttributes: [ cn ]
groupMembershipAttributes: [ member ]
usersQuery:
basedn: "ou=tanzu,dc=tkg,dc=io"
scope: sub
derefAliases: never
pageSize: 0
userUIDAttribute: dn
userNameAttributes: [ cn ]
tolerateMemberNotFoundErrors: true
tolerateMemberOutOfScopeErrors: true
## 적용전 제대로 받아오는지 확인을 한다.
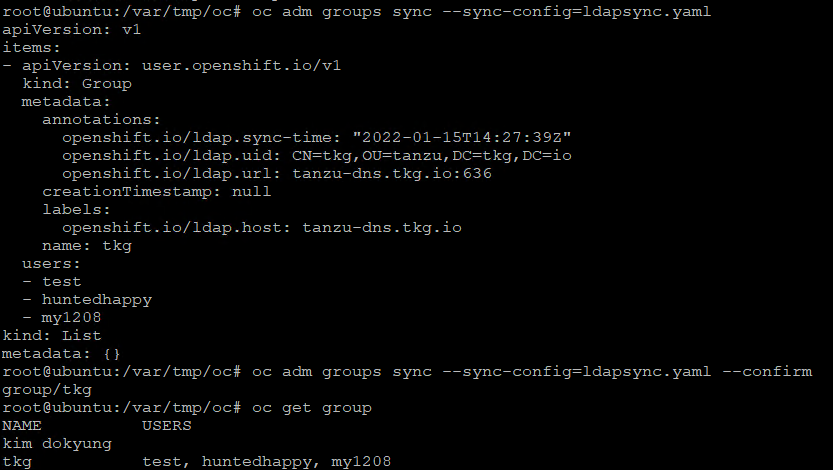
oc adm groups sync --sync-config= ldapsync.yaml
## 확인이 끝나면 적용한다.
oc adm groups sync --sync-config= ldapsync.yaml --confirm
## 권한 설정
oc adm policy add-cluster-role-to-group cluster-admin tkg
## 권한 삭제
oc adm policy remove-cluster-role-from-group cluster-admin tkg
GROUP 확인 및 적용
위에서 LDAP을 연동 하였다면 cm , secret 이 생성 된 것을 확인 할 수 있다.
1
2
3
4
5
6
7
## password 이름 확인
password = ` oc get secret -n openshift-authentication | grep v4-0-config-user-idp-0 | awk '{print $1}' `
oc get secret -n openshift-authentication $password -o jsonpath ={ .data}
## 인증서 이름 확인
ca = ` oc get cm -n openshift-authentication | grep v4-0-config-user | awk '{print $1}' `
oc get cm -n openshift-authentication $ca -o jsonpath ={ .items[ 0] .data} | awk '{print $1}'
그리고 계정 및 권한 설정을 해준다.
 1
 2
 3
 4
 5
 6
 7
 8
 9
10
11
12
13
14
15
16
17
18
19
20
21
22
23
24
25
26
27
28
29
30
31
32
33
34
35
36
37
38
39
40
41
42
43
44
45
46
47
48
49
50
51
52
53
cat << EOF | tee ldap-sync-sa-clusterrole.yaml
kind: ServiceAccount
apiVersion: v1
metadata:
  name: ldap-group-syncer
  namespace: openshift-authentication
  labels:
    app: cronjob-ldap-group-sync

---
kind: ServiceAccount
apiVersion: v1
metadata:
  name: ldap-group-syncer
  namespace: openshift-authentication
  labels:
    app: cronjob-ldap-group-sync
root@ubuntu:/var/tmp/oc/ldaps#
root@ubuntu:/var/tmp/oc/ldaps# cat clusterrole.yaml
apiVersion: rbac.authorization.k8s.io/v1
kind: ClusterRole
metadata:
  name: ldap-group-syncer
  labels:
    app: cronjob-ldap-group-sync
rules:
  - apiGroups:
      - ''
      - user.openshift.io
    resources:
      - groups
    verbs:
      - get
      - list
      - create
      - update

---
kind: ClusterRoleBinding
apiVersion: rbac.authorization.k8s.io/v1
metadata:
  name: ldap-group-syncer
  labels:
    app: cronjob-ldap-group-sync
subjects:
  - kind: ServiceAccount
    name: ldap-group-syncer
    namespace: openshift-authentication
roleRef:
  apiGroup: rbac.authorization.k8s.io
  kind: ClusterRole
  name: ldap-group-syncer
EOF
LDAP의 자동 Sync를 구성하기 위해 config-map 및 job 설정
witelist / balcklist의 경우 ldapsearch에서 distinguishedName: CN=test test,OU=tanzu,DC=tkg,DC=io 이부분의 이름으로 넣어야함. , 만약 별도로 witelist / blacklist가 필요 없으면 제거 해도 된다.
  1
  2
  3
  4
  5
  6
  7
  8
  9
 10
 11
 12
 13
 14
 15
 16
 17
 18
 19
 20
 21
 22
 23
 24
 25
 26
 27
 28
 29
 30
 31
 32
 33
 34
 35
 36
 37
 38
 39
 40
 41
 42
 43
 44
 45
 46
 47
 48
 49
 50
 51
 52
 53
 54
 55
 56
 57
 58
 59
 60
 61
 62
 63
 64
 65
 66
 67
 68
 69
 70
 71
 72
 73
 74
 75
 76
 77
 78
 79
 80
 81
 82
 83
 84
 85
 86
 87
 88
 89
 90
 91
 92
 93
 94
 95
 96
 97
 98
 99
100
101
102
103
104
105
106
107
108
109
110
111
112
113
114
115
116
117
118
119
120
121
122
123
124
125
cat << EOF | tee ldap-sync-cm-cron.yaml
kind: ConfigMap
apiVersion: v1
metadata:
  name: ldap-group-syncer
  namespace: openshift-authentication
  labels:
    app: cronjob-ldap-group-sync
data:
  ldap-group-sync.yaml: |
    kind: LDAPSyncConfig
    apiVersion: v1
    url: ldaps://tanzu-dns.tkg.io
    bindDN: cn=administrator,cn=users,dc=tkg,dc=io
    bindPassword:
      file: "/etc/secrets/bindPassword"                   ## 위에서 설명한 secret, cronjob에서 voluemount 후 적용
    insecure: false
    ca: "/ldap-sync/ca/ca.crt"                            ## 위에서 설명한 configmap, cronjob에서 voluemount 후 적용
    rfc2307:
        groupsQuery:
            baseDN: "ou=tanzu,dc=tkg,dc=io"
            scope: sub
            derefAliases: never
            filter: (objectclass=group)
        groupUIDAttribute: dn
        groupNameAttributes: [ cn ]
        groupMembershipAttributes: [ member ]
        usersQuery:
            baseDN: "ou=tanzu,dc=tkg,dc=io"
            scope: sub
            derefAliases: never
            pageSize: 0
        userUIDAttribute: dn
        userNameAttributes: [ sAMAccountName ]
        tolerateMemberNotFoundErrors: true
        tolerateMemberOutOfScopeErrors: true
---
kind: ConfigMap
apiVersion: v1
metadata:
  name: ldap-group-syncer-whitelist
  namespace: openshift-authentication
  labels:
    app: cronjob-ldap-group-sync
data:
  whitelist.txt: |
    CN=kim dokyung,OU=tanzu,DC=tkg,DC=io

---
kind: ConfigMap
apiVersion: v1
metadata:
  name: ldap-group-syncer-blacklist
  namespace: openshift-authentication
  labels:
    app: cronjob-ldap-group-sync
data:
  blacklist.txt: |
    CN=tkg,OU=tanzu,DC=tkg,DC=io

---
kind: CronJob
apiVersion: batch/v1beta1
metadata:
  name: ldap-group-syncer
  namespace: openshift-authentication
  labels:
    app: cronjob-ldap-group-sync
spec:
  schedule: "*/1 * * * *"
  concurrencyPolicy: Forbid
  successfulJobsHistoryLimit: 5
  failedJobsHistoryLimit: 5
  jobTemplate:
    metadata:
      labels:
        app: cronjob-ldap-group-sync
    spec:
      backoffLimit: 0
      template:
        metadata:
          labels:
            app: cronjob-ldap-group-sync
        spec:
          containers:
            - name: ldap-group-sync
              image: "registry.redhat.io/openshift4/ose-cli:v4.7"
              command:
                - "/bin/bash"
                - "-c"
                - oc adm groups sync --whitelist=/etc/whitelist/whitelist.txt --blacklist=/etc/blacklist/blacklist.txt --sync-config=/etc/config/ldap-group-sync.yaml --confirm
              volumeMounts:
                - mountPath: "/etc/blacklist"
                  name: "ldap-sync-volume-blacklist"
                - mountPath: "/etc/whitelist"
                  name: "ldap-sync-volume-whitelist"
                - mountPath: "/etc/config"
                  name: "ldap-sync-volume"
                - mountPath: "/etc/secrets"
                  name: "ldap-bind-password"
                - mountPath: "/ldap-sync/ca"
                  name: "ldap-sync-ca"
          volumes:
            - name: "ldap-sync-volume-blacklist"                  ## volumes을 모두 연결하여 assign
              configMap:
                name: "ldap-group-syncer-blacklist"
            - name: "ldap-sync-volume-whitelist"                  ## volumes을 모두 연결하여 assign
              configMap:
                name: "ldap-group-syncer-whitelist"
            - name: "ldap-sync-volume"                            ## volumes을 모두 연결하여 assign
              configMap:
                name: "ldap-group-syncer"
            - name: "ldap-sync-ca"                                ## volumes을 모두 연결하여 assign
              configMap:
                name: "v4-0-config-user-idp-0-ca"
            - name: "ldap-bind-password"                          ## volumes을 모두 연결하여 assign
              secret:
                secretName: "v4-0-config-user-idp-0-bind-password"
          restartPolicy: "Never"
          terminationGracePeriodSeconds: 30
          activeDeadlineSeconds: 500
          dnsPolicy: "ClusterFirst"
          serviceAccountName: "ldap-group-syncer"
          serviceAccount: "ldap-group-syncer"
EOF
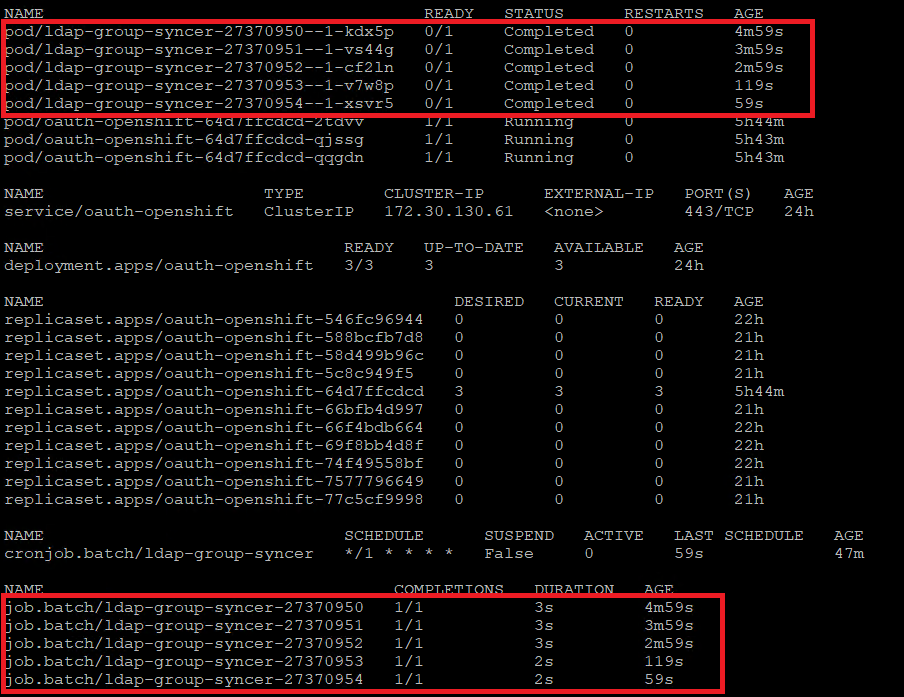
이후에 자동으로 싱크가 되는 것을 알수 있다. 만약에 그룹을 추가 했는대 그 그룹만 막고 싶으면 blacklist, 또는 기존에 있는 것만 하고 자동 싱크 하고 싶으면 witelist를 적용 하면된다.
흠 생각에는 그냥 witelist 방식으로만 적용하면 될 것으로 보인다. 만약에 필요 하다면 필요 없이 모든 그룹을 자동 싱크 하겠따면 witelist / blaklist는 필요 없다.
자동 싱크가 되었으면 해당하는 그룹에 권한을 준다.
1
2
3
4
5
## 권한 설정
oc adm policy add-cluster-role-to-group cluster-admin tkg

## 권한 삭제
oc adm policy remove-cluster-role-from-group cluster-admin tkg
자동 sync 구성 완료